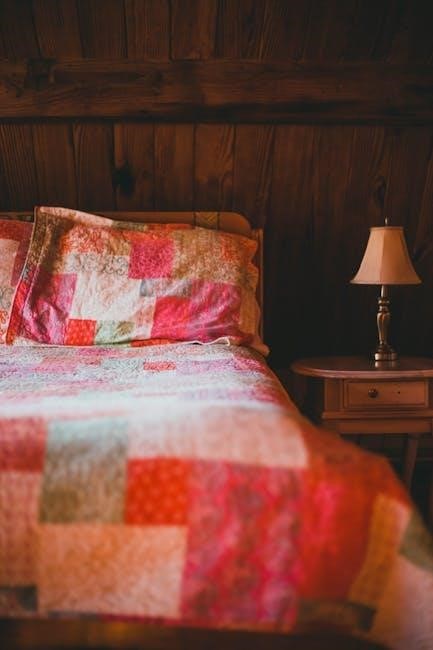
Crumb quilting transforms small fabric scraps into vibrant quilts․ It’s a creative way to repurpose leftover materials, offering a sustainable and artistic approach to traditional quilting techniques․
What is a Crumb Quilt?
A crumb quilt is a unique sewing project created from small, irregular fabric scraps․ These “crumbs” are pieced together to form larger blocks, often resulting in a patchwork design․ Unlike traditional quilts, crumb quilts embrace imperfection and creativity, using even the tiniest leftover pieces․ The process involves sorting scraps by color or size, then sewing them into blocks․ This method is ideal for crafters who enjoy upcycling materials and experimenting with unconventional patterns․ Crumb quilts are both eco-friendly and visually striking, offering a fun challenge for quilters of all skill levels․ They celebrate the beauty of scraps and the joy of creating something meaningful from what might otherwise be discarded․
Benefits of Making a Crumb Quilt
Creating a crumb quilt offers numerous benefits, including reducing fabric waste and giving new life to small scraps․ It’s a cost-effective way to craft unique, eco-friendly quilts․ This method encourages creativity, as it allows for experimentation with diverse fabrics and colors․ Crumb quilting is also a great way to practice piecing techniques and improve sewing skills․ The process can be meditative, as it involves working with small, manageable pieces․ Additionally, crumb quilts make thoughtful, personalized gifts or home decor items․ They celebrate sustainability and the joy of transforming leftovers into something beautiful and functional․ This approach is perfect for crafters who value upcycling and artistic expression․
Gathering Materials and Sorting Scraps
Gather small fabric remnants, sorting them by color and size․ This step ensures a cohesive look and makes piecing easier, maximizing scrap usage creatively․
Sorting Fabric Scraps by Color
Sorting fabric scraps by color is essential for creating visually appealing crumb quilts․ Group similar hues together to form cohesive blocks or patterns․ This step helps in maintaining consistency and balance, ensuring the final quilt looks harmonious․ Separating scraps by color also allows for easy access when piecing crumbs, saving time and effort․ For example, blues and greens can form nature-inspired blocks, while brights can add vibrant accents․ Additionally, sorted scraps can be used strategically for sashes, borders, or accents, enhancing the quilt’s overall design․ Proper organization ensures no scrap goes to waste, making the quilting process efficient and enjoyable․
Selecting the Smallest Crumbs to Start
Starting with the smallest fabric crumbs is a great way to begin your crumb quilting project․ These tiny scraps are often overlooked but can add unique character to your quilt․ By using small crumbs first, you ensure that even the tiniest pieces are utilized, reducing waste and giving your quilt a personalized touch․ This approach also helps manage the project’s scale, making it less overwhelming․ Small crumbs can be paired with slightly larger pieces to create balanced blocks․ This method encourages creativity and makes the process feel more achievable․ It’s a practical way to build momentum while transforming scraps into something truly special and meaningful․
Creating the Crumb Quilt Blocks
Transform fabric scraps into vibrant blocks by piecing small crumbs together․ This step-by-step process offers a creative way to organize and sew fragments into unique designs, fostering a sense of accomplishment with each completed block․
Step-by-Step Guide to Piecing Crumbs
Begin by selecting small fabric crumbs and arranging them into a cohesive layout․ Sew the pieces together in strips or squares, ensuring a secure seam․ Press each seam as you go to maintain a flat surface․ Gradually build the block by adding complementary crumbs, mixing textures and colors for visual interest․ Work section by section to avoid overwhelming the project․ Use a rotary cutter or scissors to trim uneven edges․ As the block grows, pair it with others to form a larger design․ This method allows for endless creativity, transforming scraps into a unique and charming quilt․ Piecing crumbs is both therapeutic and rewarding, offering a fresh perspective on fabric scraps․
Ironing and Pressing as You Go
Ironing and pressing are essential steps in crumb quilting to ensure a smooth, professional finish․ After sewing each strip or block, press the seams flat with a hot iron to prevent puckering and distortion․ Use steam if needed, but avoid scorching delicate fabrics․ Pressing as you go helps maintain accuracy and makes piecing easier․ Always press seams in the same direction, especially when working with small crumbs, to avoid bulkiness․ A well-pressed quilt top ensures even stitching and a polished appearance․ Regular pressing also helps in managing the fabric layers, making it easier to handle larger blocks as the quilt progresses․ This step is crucial for achieving a crisp, clean finish in your crumb quilt project․
Working in Sections for Better Organization
Working in sections is a practical approach to maintaining organization while creating a crumb quilt․ Divide your workspace into areas for sorting, sewing, and pressing to streamline the process․ Use small containers or bins to separate crumbs by color, size, or project phase․ This method prevents pieces from getting lost or mixed up․ Start by focusing on one block or section at a time, assembling crumbs into strips or small blocks before combining them into larger units․ A portable sewing mat or tray can help keep crumbs tidy and within reach․ Organizing your work in sections makes the process more manageable and enjoyable, allowing you to focus on creativity without clutter․
Forming Larger Blocks and Joining Them
Combine small crumb blocks into larger ones, ensuring alignment and balance․ Press seams to create a cohesive design, then join blocks with careful matching and smooth stitching․
Combining Small Crumbs into Bigger Blocks
Once small crumb blocks are pieced, combine them into larger blocks by aligning edges carefully․ Press seams to ensure a flat finish․ Work in sections to maintain organization and balance․ Use a design wall to arrange blocks visually before sewing them together․ This step allows for creativity in layout and color distribution․ For consistency, ensure blocks are evenly sized or add filler strips if needed․ Mixing crumbs with solid fabrics can enhance the design․ This method transforms scattered scraps into a cohesive, visually appealing quilt top, ready for borders and finishing touches․
Joining Blocks Together
Once larger blocks are formed, the next step is to join them together to create the quilt top․ Start by aligning the edges carefully, ensuring seams match for a cohesive look․ Use a 1/4-inch seam allowance and press as you go to maintain a flat finish․ Sew blocks in rows, adding sashing if desired for uniformity and visual separation․ Arrange blocks thoughtfully, considering color distribution and overall design․ For uneven blocks, add filler strips or squares to balance the layout․ Use pins to secure blocks while sewing, especially for mismatched edges․ This step transforms individual blocks into a unified quilt top, ready for borders and finishing touches․
Adding Borders and Finishing Touches
Add sashes or borders using crumb strips for a decorative edge․ Complete the quilt by attaching a backing and binding, finishing with a personalized touch․
Using Crumbs for Sashes or Borders
Using crumbs for sashes or borders adds a creative and colorful touch to your quilt․ Simply sew together strips of leftover fabric to create vibrant, mismatched sashing․ This technique not only uses up small scraps but also adds visual interest to the quilt’s design․ For a cohesive look, pair the crumb strips with solid or tonal fabrics to balance the randomness․ Alternatively, use long, continuous strips of crumbs as borders, sewing them together to form a seamless edge․ This approach keeps fabric waste minimal while enhancing the quilt’s overall aesthetic with a dynamic, scrap-friendly finish․
Adding a Backing and Binding the Quilt
Once your crumb quilt top is complete, add a backing to finish it․ Choose a fabric that complements the quilt’s colors and style․ Layer the backing, batting, and quilt top, then secure them with pins or spray adhesive․ Stitch the layers together, leaving an opening to turn the quilt right side out․ After turning, press the edges and hand-stitch the opening closed․ For the binding, use pre-made strips or create your own from leftover crumbs․ Attach the binding to the quilt edges, folding it over to cover the raw edges․ This final step completes your crumb quilt, transforming scraps into a beautiful, functional piece of art․

Creative Ideas and Variations
Explore creative ideas by using crumbs for vibrant borders, sashes, or improv-style blocks․ Transform leftover fabric into unique quilts, bags, or home decor items․
Making Scrappy Improv-Style Blocks
Scrappy improv-style blocks are a fun and spontaneous way to use small fabric crumbs․ Start with a tiny piece of fabric, then surround it with strips or scraps of varying widths and colors․ Press as you go to keep the block flat and manageable․ This method encourages creativity, allowing you to build the block organically without a set pattern․ Experiment with different angles, shapes, and layouts to create unique designs․ Improv blocks are perfect for adding personality to your quilt or using as standalone pieces for smaller projects like bags or home decor․ The flexibility of this technique makes it ideal for fabric scraps of all sizes․
Using Crumbs for Other Projects
Fabric crumbs are incredibly versatile and can be used for a variety of small projects beyond quilting․ Try making coasters, hot pads, or even ornaments by sewing crumbs into small squares or shapes․ They can also be used to create unique zippered pouches or bags, adding a personalized touch to everyday items․ For a decorative flair, use crumbs to make appliqué designs or embellishments for clothing or home decor․ Even small amounts of fabric can be transformed into functional items like keychains or sachets․ This approach not only reduces waste but also allows you to experiment with creative ideas in a low-pressure way․ The possibilities are endless, making crumbs a treasure trove for crafty projects․