The 4-in-1 crib is a versatile, adaptable furniture solution designed to grow with your child, offering four functional configurations to meet their evolving needs. It transitions seamlessly from a crib to a toddler bed, daybed, and finally a full-size bed, ensuring long-term value and convenience. With a focus on safety, durability, and comfort, these cribs are crafted from high-quality, non-toxic materials, adhering to strict safety standards. The included manual provides detailed assembly instructions and essential safety guidelines, making it easy to set up and use responsibly. This crib is an excellent investment for parents seeking a practical, eco-friendly solution for their child’s sleeping needs.
Overview of the 4-in-1 Crib Features
The 4-in-1 crib is designed with versatility and practicality in mind, offering four distinct configurations: crib, toddler bed, daybed, and full-size bed. It features adjustable mattress height settings to accommodate growing children and ensure safety at every stage. Constructed from durable, eco-friendly materials, the crib is built to last, with a focus on non-toxic finishes and sturdy craftsmanship. Additional features include built-in storage drawers or shelves for organizing baby essentials, and smooth-gliding wheels for easy mobility. The crib also meets or exceeds all safety standards, ensuring a secure environment for your child.
Benefits of Using a 4-in-1 Crib
The 4-in-1 crib offers unparalleled convenience and value, adapting to your child’s needs from infancy to adulthood. Its multi-functional design eliminates the need for frequent furniture upgrades, saving time and money. With safety certifications like GREENGUARD GOLD, it ensures a non-toxic, eco-friendly environment. The crib’s durability and easy assembly make it a practical choice for busy parents. Additionally, its space-saving features and stylish designs complement any nursery decor. This crib is a long-term investment, providing comfort, safety, and versatility for years to come.

Safety Guidelines and Precautions
Always follow the assembly instructions and safety tips provided in the manual. Use the correct mattress size and avoid adding pillows or extra padding. Ensure all bolts and screws are tightly secured to prevent loose parts. Keep small parts out of reach of children to avoid choking hazards. Regularly inspect the crib for damage or wear. Never leave the crib unattended during assembly or use. Adhere to weight and age limits for each configuration.
General Safety Tips for Assembly and Use
Always read the manual carefully before starting assembly to ensure proper setup. Use only the tools and hardware provided to avoid damaging the crib. Check for any missing or damaged parts before assembly. Tighten all bolts and screws securely to prevent loose joints. Ensure the crib is placed on a firm, flat surface away from windows and curtains. Never add pillows, blankets, or padding inside the crib to avoid suffocation risks. Keep the surrounding area clear of toys or objects that could pose a tripping hazard. Regularly inspect the crib for wear or damage and address issues promptly.
Important Warnings and Cautions
Never use abrasive cleaners or window cleaners, as they may damage the crib’s finish or protective coating. Avoid adding pillows, comforters, or extra padding inside the crib to prevent suffocation risks. Ensure all fasteners are securely tightened to avoid loose parts that could trap clothing or body parts. Keep small hardware out of reach of children to prevent choking hazards. Only use mattresses that fit the specified dimensions (at least 51-5/8″ x 27-1/4″). Adult assembly is required, and proper setup is essential for safety. Regularly inspect for wear and tear.
Assembly Instructions
Begin by unfolding the crib frame and attaching the legs using the provided Allen key. Follow the diagrams to secure all bolts tightly. Next, attach the mattress support and ensure all hardware is properly aligned. Finally, double-check all connections for stability before placing the mattress inside. Always refer to the included manual for precise instructions and diagrams to ensure a safe and correct assembly process;
Preparing the Tools and Parts
Begin by gathering all tools and hardware included in the box, such as the Allen key, bolts, and screws. Organize the parts according to the parts list provided in the manual. Ensure all components are accounted for before starting assembly. Lay out the crib frame, mattress support, and legs on a flat, scratch-free surface. Verify that all hardware matches the specifications in the instructions. Store the assembly manual in the attached pouch for easy reference. Double-check that no parts are damaged or missing. This step ensures a smooth and efficient assembly process. Always follow the manual’s guidance for proper preparation.
Step-by-Step Assembly Process
Start by attaching the legs to the crib frame using the provided bolts. Ensure they are securely tightened. Next, unfold the bed frame and extend the legs until fully straight. Rotate the support arms and hook them onto the bolts at each corner. Use the Allen key to tighten all connections firmly. Refer to the diagrams for accurate alignment. Once the frame is stable, attach the mattress support and ensure it is level. Double-check all bolts for tightness. Follow the manual’s sequence to avoid missing any steps. Keep the instructions nearby for quick reference during assembly. This method ensures a sturdy and safe setup.
Organizing Hardware and Components
Begin by carefully unpacking and inventorying all hardware and components. Separate screws, bolts, and brackets, and match them to the parts list in the manual. Use the provided diagrams to identify each piece. Store small parts in labeled bags to prevent loss. Lay out larger components, such as the frame and mattress support, on a flat, scratch-free surface. Ensure all tools, like the Allen key, are within reach. Before starting assembly, double-check that no parts are missing or damaged. Organizing everything beforehand ensures a smooth and efficient assembly process.
Converting the Crib
The 4-in-1 crib offers seamless transitions from a crib to a toddler bed, daybed, and full-size bed, adapting to your child’s growth with ease and safety.
From Crib to Toddler Bed
Converting the crib to a toddler bed is a straightforward process that ensures your child’s safety and comfort as they grow. Begin by lowering the crib mattress to its lowest position to prepare for the transition. Remove the front rail and replace it with the toddler bed rail, which is typically provided in the hardware kit. Ensure all bolts and screws are securely tightened to maintain stability. The toddler bed configuration allows your child to enter and exit the bed independently while still providing a safe sleeping environment. Always follow the manual’s specific instructions for this conversion to avoid any structural issues. Regularly check the bed’s frame and rails for loose parts and tighten them as needed. Never add pillows or extra padding under the mattress, as this can pose a safety hazard. By following these steps, you can create a cozy and secure toddler bed for your child to enjoy.
From Toddler Bed to Daybed
Transitioning from a toddler bed to a daybed enhances your child’s sleeping experience by offering a more spacious and comfortable option. Start by ensuring the mattress is at the correct height, typically the lowest setting for a daybed configuration. Remove any remaining toddler bed rails and attach the daybed side panels or frame, following the manufacturer’s instructions. Tighten all bolts and screws securely to maintain stability; The daybed setup provides a larger sleeping area while maintaining safety and support. Regularly inspect the frame for any loose parts and ensure the mattress fits snugly within the frame. This conversion is ideal for older toddlers and young children who need more room to move comfortably. Always refer to the manual for specific guidance on this transition to ensure everything is assembled correctly and safely.
From Daybed to Full-Size Bed
Converting your daybed to a full-size bed is a straightforward process that provides a spacious sleeping solution for older children and teenagers. Begin by removing any existing daybed side panels or rails and attach the full-size bed frame components, following the manual’s instructions. Ensure the mattress support system is properly adjusted to accommodate a standard full-size mattress. Secure all bolts and screws tightly to ensure stability and safety. This final configuration offers a comfortable and durable sleeping environment. Always double-check for loose parts and ensure the mattress fits securely within the frame. Refer to the manual for specific guidance on this conversion to guarantee a safe and proper setup.
Maintenance and Cleaning
Regular cleaning involves using a damp cloth without harsh chemicals. Inspect hardware regularly and tighten loose parts. Avoid abrasive cleaners to maintain the finish and ensure durability.
Cleaning the Crib Surface
Regular cleaning is essential for maintaining hygiene and safety. Use a soft, damp cloth to wipe down the crib’s surfaces, avoiding harsh chemicals or abrasive cleaners. Never use window cleaners or strong detergents, as they may damage the finish or protective coatings. For stubborn stains, dilute a mild soap with water and gently scrub the area. Ensure the crib is completely dry after cleaning to prevent moisture buildup. Avoid using bleach or acidic solutions, as they can harm the materials. Cleaning regularly helps maintain the crib’s durability and ensures a safe environment for your child.
Maintaining the Crib’s Durability
To ensure the crib remains durable, regularly inspect all hardware and connections for looseness and tighten as needed. Avoid exposing the crib to excessive moisture, as it can damage the materials. Never overload the crib with additional weight beyond its designed capacity. Store the crib in a dry, cool place when not in use. Use only the recommended mattress size to maintain proper fit and support. By following these practices, you can extend the lifespan of the crib and ensure it remains a safe and sturdy piece of furniture for years to come.
Troubleshooting Common Issues
If you encounter issues during assembly or use, check for loose connections or missing hardware. Ensure all bolts and screws are tightly secured. For wobbling, verify that all legs are evenly positioned and the floor is level. If parts are damaged or missing, contact the manufacturer for replacements. Do not proceed with assembly if any components are compromised. For scratches or marks, avoid harsh chemicals and use a damp cloth for cleaning. If the crib creaks, apply a small amount of silicone-based lubricant to moving parts. Always refer to the manual for guidance on resolving specific problems.

Warranty and Manufacturer Support
Your 4-in-1 crib is backed by a comprehensive manufacturer warranty, ensuring coverage for defects in materials and workmanship. Register your product to activate the warranty and enjoy peace of mind. For assistance, contact the manufacturer’s customer support team via phone or email, as detailed in the manual. Do not return the crib to the retailer without prior authorization. The warranty does not cover damage caused by improper assembly or misuse. Refer to the warranty section in your manual for specific terms and conditions. Manufacturer support is available to address any concerns or provide replacement parts if needed.

Parts List and Hardware Requirements
Your 4-in-1 crib includes a detailed parts list in the manual, ensuring all components are accounted for before assembly. Typical hardware includes bolts, screws, and an Allen key, with specific quantities listed to avoid shortages. Additional tools like a screwdriver may be required. Verify all parts are present and undamaged before starting. Do not substitute hardware with alternative parts, as this may compromise safety and functionality. If any items are missing or damaged, contact the manufacturer for replacements. Organize hardware by type and size to streamline the assembly process. Refer to the manual for diagrams and part descriptions to ensure accuracy. Proper organization and verification of parts are critical for a secure and efficient setup.
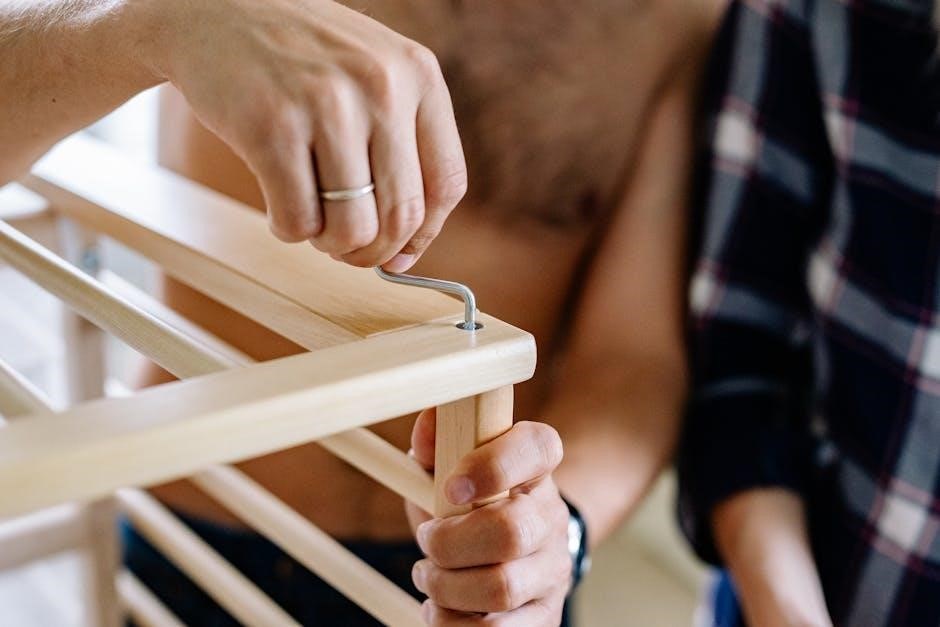
Tools Needed for Assembly
For assembling your 4-in-1 crib, you’ll need an Allen key (usually provided) and a screwdriver for driving screws. Additional tools like a wrench or pliers may be required for securing bolts. Ensure all tools are readily available to streamline the process. Refer to the manual for specific tool recommendations, as requirements may vary slightly by model. A rubber mallet can be helpful for gently tapping parts into place without causing damage. Organize your tools beforehand to avoid delays. If any tools are missing, consider having backups on hand to complete the assembly efficiently and safely. Proper tools ensure a secure and correct setup.