cinch jeans fit guide

Welcome to the Cinch Jeans Fit Guide, your ultimate resource for finding the perfect pair of jeans. Discover how to achieve effortless style, comfort, and a flattering fit tailored to you.

Understanding the Importance of Proper Fit

A proper fit is essential for both comfort and style, ensuring your Cinch Jeans look and feel their best. Clothes that fit well enhance confidence and overall appearance, while ill-fitting garments can be uncomfortable and unflattering. Proper fit avoids issues like tightness, which can cause puckering at seams or buttons pulling, and ensures jeans move naturally with your body. Cinch Jeans are designed to cater to various body types and lifestyles, offering a range of styles to suit different needs. Whether you prefer relaxed, slim, or athletic fits, the right fit ensures optimal comfort and a polished look. Investing time in finding your perfect fit pays off in long-term satisfaction and versatility. Proper fit is key to enjoying your Cinch Jeans and making the most of your wardrobe.

Overview of Cinch Jeans Styles and Designs

Cinch Jeans offers a diverse range of styles and designs to cater to different preferences and needs. From classic to modern cuts, their collection includes relaxed, slim, and athletic fits, ensuring there’s something for every body type and lifestyle. The relaxed fit provides a comfortable, loose silhouette, while the slim fit offers a more tailored look. For those with an active lifestyle, the athletic fit combines comfort and flexibility. Cinch Jeans also features varying rises, such as mid-rise and low-rise options, to suit individual style preferences. Fabrics range from stretch denim for added flexibility to heavy-duty denim for durability. Designs include boot cut, straight leg, and tapered styles, allowing for versatility in pairing with boots, shoes, or casual wear. With a focus on quality and craftsmanship, Cinch Jeans ensures a perfect blend of style, comfort, and functionality in every pair.

Types of Cinch Jeans Fits

Cinch Jeans offers three main fits: Relaxed Fit, Slim Fit, and Athletic Fit. Each style caters to different body types and preferences, ensuring comfort, flexibility, and a flattering silhouette for every wearer.

Relaxed Fit Jeans

Relaxed Fit Jeans from Cinch are designed for ultimate comfort and a laid-back style. Featuring a mid-rise design, these jeans offer a spacious thigh and knee area, making them ideal for those seeking a roomy fit without sacrificing style. The relaxed fit is perfect for everyday wear, providing a comfortable feel that isn’t too tight or restrictive. With a generous boot cut, these jeans pair effortlessly with boots or casual footwear, creating a balanced and timeless look. The fabric is crafted for durability and flexibility, ensuring long-lasting wear. Whether you’re working outdoors, running errands, or enjoying a casual day out, Relaxed Fit Jeans deliver the perfect blend of comfort and practicality. Their versatile design makes them suitable for various body types and lifestyles, ensuring a flattering and relaxed silhouette for everyone.

Slim Fit Jeans

Slim Fit Jeans by Cinch are crafted for a modern, streamlined look that contours to your body. Designed to eliminate excess fabric, these jeans provide a sleek, tailored appearance while maintaining comfort. The slim fit is slightly narrower through the thigh and knee compared to other styles, creating a sharp, polished silhouette. Perfect for those who prefer a fashionable yet understated look, Slim Fit Jeans are versatile enough for both casual and semi-formal occasions. The fabric is engineered to move with you, offering flexibility without compromising on style. Whether you’re dressing up or keeping it simple, Slim Fit Jeans from Cinch deliver a sophisticated, contemporary aesthetic that complements a variety of body types and personal styles. Their streamlined design ensures a flattering fit, making them a go-to choice for anyone seeking a balance between fashion and comfort.

Athletic Fit Jeans

Athletic Fit Jeans from Cinch are designed for active individuals who value both style and performance. These jeans feature a slightly roomier fit through the thigh and knee, offering enhanced mobility and comfort. The athletic fit is ideal for those with an athletic build or anyone seeking a more relaxed silhouette without sacrificing a modern look. Crafted with stretchy fabrics, these jeans provide flexibility, making them perfect for everyday wear or outdoor activities. The design emphasizes comfort while maintaining a stylish appeal, ensuring you stay confident and comfortable all day long. Whether you’re working out, running errands, or just lounging, Athletic Fit Jeans deliver the perfect blend of practicality and fashion. Their tailored yet accommodating fit makes them a versatile choice for anyone prioritizing movement and ease without compromising on style.

How to Measure Yourself for the Best Fit

Measure your waist at the narrowest point and hips at the widest part. Check inseam for pant length. Ensure buttons lie flat and fabric doesn’t pucker for the best fit.

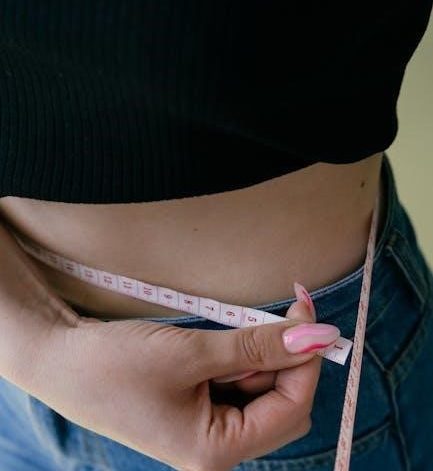
Measuring Your Waist

Measuring your waist accurately is crucial for a perfect fit. Stand upright and locate the narrowest point, typically just above your hipbone. Wrap a flexible tape measure snugly around this area, ensuring it’s parallel to the floor; Do not pull the tape too tight or leave it loose. Take note of the measurement in inches or centimeters. This will help determine your ideal jean size according to Cinch’s size chart. For the most accurate result, measure without clothing or wear a thin belt to guide the tape. Remember, the waist measurement is essential for styles like slim or athletic fits, which rely on a precise fit through the midsection. Always refer to Cinch’s specific guidelines, as different styles may have slight variations in fit.

Measuring Your Hips

To measure your hips accurately, stand upright and locate the widest part of your hips, typically about 7-9 inches below your waistline. Wrap a flexible tape measure around this area, ensuring it is parallel to the floor and not too tight or loose. Take note of the measurement in inches or centimeters. This measurement is crucial for determining the best fit, especially for styles like boot cut or relaxed fit jeans, which are designed to complement your hip shape. For the most accurate result, wear lightweight clothing or no clothing at all. If you’re unsure, ask someone to help you measure. This step ensures that your jeans will sit comfortably and look flattering, whether you prefer a slim, athletic, or relaxed fit. Accurate hip measurements are key to finding your perfect pair of Cinch jeans.

Measuring Your Inseam

To measure your inseam, start by standing upright and placing your feet shoulder-width apart. Locate the inside of your leg, from the top of your thigh down to your ankle bone. Use a flexible tape measure or a ruler to measure this length. For the most accurate result, ensure the tape measure is straight and not twisted. If using a ruler, measure along the inside of your leg from the base of your groin to the bottom of your heel. This measurement will help determine the optimal pant length for your Cinch jeans. Note that inseam measurements can vary slightly depending on the style of jeans, such as boot cut or slim fit. Wearing shoes during the measurement can also provide a more realistic fit. Accurate inseam measurement ensures your jeans will break perfectly at your shoes, creating a polished and comfortable look.

Determining Your Perfect Cinch Jeans Fit

Find your ideal Cinch Jeans fit by considering your body type, lifestyle, and personal style. Choose fabrics, rises, and inseams that complement your shape for a flattering, comfortable, and effortless look.

Choosing the Right Fabric for Your Lifestyle

Selecting the right fabric is crucial for both comfort and durability. If you lead an active lifestyle, consider stretch denim for flexibility. For a classic look, opt for 100% cotton. Treated fabrics, like water-resistant or wrinkle-free, suit specific needs. Pair your choice with the right fit for a perfect blend of style and functionality.

Understanding Jean Rise Options

Jean rise refers to how high or low the waistline sits on your body, significantly impacting both comfort and style. Low-rise jeans sit below the natural waist, offering a trendy, modern look. Mid-rise jeans provide a balanced fit, sitting just below the belly button, ideal for everyday wear. High-rise jeans sit at or above the natural waist, offering a retro vibe and additional coverage. The right rise depends on your body type and personal style. If you have a longer torso, high-rise jeans can elongate your legs, while low-rise pairs complement shorter torsos. Consider your lifestyle too—high-rise options are great for active days, while mid-rise strikes a balance. Experiment with different rises to find what makes you feel confident and comfortable. The perfect rise enhances your overall silhouette and ensures all-day wearability.

Considering Your Body Type and Style

Your body type and personal style play a crucial role in selecting the perfect pair of Cinch jeans. For pear-shaped individuals, flared or bootcut styles balance the hips and thighs, while straight-leg jeans complement rectangular body types. Hourglass figures look stunning in high-waisted designs that accentuate the waistline. Petite frames benefit from high-waisted or straight-leg jeans to create a longer, leaner appearance. Consider your lifestyle and preferences—whether you prefer classic and timeless or trendy and edgy looks. The right style should enhance your confidence and align with your wardrobe. Experiment with different cuts to find what flatters your silhouette and reflects your unique taste. Remember, the perfect jeans are those that make you feel great and suit your body proportions. By aligning your choice with your body type and style, you ensure a flattering and comfortable fit every time.

Continue Reading

yamaha command link installation guide

The Yamaha Command Link system offers a comprehensive, integrated solution for monitoring and controlling your outboard motor, providing real-time data and enhanced boating experiences through seamless connectivity.

Overview of the Yamaha Command Link Multifunction Meter

The Yamaha Command Link Multifunction Meter is a cutting-edge display system designed to centralize and simplify monitoring of your outboard motor’s performance. It provides real-time data, including engine speed, fuel level, trim, and diagnostic information, all in one intuitive interface. Compatible with various Yamaha outboard models, this meter enhances boating experiences by offering customizable displays and seamless integration with other Command Link components, such as the Helm Master system. Its user-friendly design ensures easy navigation, while its robust construction withstands marine environments. The meter supports NMEA 2000 networking, allowing connectivity with additional marine electronics for a fully integrated command center.

Benefits of Upgrading to a Command Link System

Upgrading to a Yamaha Command Link system offers enhanced functionality, convenience, and performance. It centralizes engine monitoring, simplifies diagnostics, and provides real-time data access, improving decision-making on the water. The system supports NMEA 2000 integration, allowing seamless connectivity with other marine electronics. Customizable displays and intuitive controls reduce operator fatigue. Additionally, the system supports advanced features like Helm Master, offering precise boat control. Enhanced durability and resistance to marine environments ensure long-term reliability. Overall, upgrading to a Command Link system elevates your boating experience with improved efficiency, safety, and enjoyment.

Pre-Installation Requirements

Ensure compatibility by verifying your outboard motor supports the Command Link system. Gather necessary tools, manuals, and materials as specified by Yamaha guidelines for a smooth setup.

Compatibility Check: Ensuring Your Outboard Motor Supports Command Link

Before proceeding with installation, verify that your outboard motor is compatible with the Yamaha Command Link system. This system is typically compatible with Yamaha outboard motors manufactured from 2006 onward, including models such as the F60TLR, F70, and Z200NETO. Ensure that your motor supports digital gauges and NMEA 2000 network connectivity, as these are essential for the Command Link system to function properly. Refer to the Yamaha parts catalog or consult with a Yamaha dealer to confirm compatibility and obtain the correct wiring diagrams and adapters for your specific motor model. Proper compatibility ensures a seamless integration and optimal performance of the Command Link system.

Gathering Necessary Tools and Materials

To ensure a smooth installation of the Yamaha Command Link system, gather all required tools and materials beforehand. Essential tools include screwdrivers, wire strippers, crimpers, and a multimeter for electrical connections. Materials needed include the Command Link multifunction meter, wiring harness, connectors, and adapters specific to your outboard motor model. Refer to the Yamaha Command Link Installation Manual for a detailed list of components, such as the 6Y8-0E83R-81-00 gauge kit or the 90894-62981-66 wiring harness. Ensure all parts are genuine Yamaha products to guarantee compatibility and system reliability. Proper preparation will help avoid delays and ensure a successful installation.

Installation Steps

Install the Command Link system by mounting the multifunction meter, connecting the wiring harness to the outboard motor, and configuring the system for optimal performance.

Mounting the Command Link Multifunction Meter

Mount the Command Link multifunction meter in a visible and accessible location, ensuring it is level and securely fastened. Use the provided mounting bracket to attach the meter to your boat’s dashboard or console. Ensure the surface is clean and dry to avoid any installation issues. Connect the wiring harness carefully, following the diagram provided in the manual. Once mounted, test the meter to confirm proper function and visibility. Avoid exposing the meter to direct water spray or excessive vibrations for optimal performance and longevity.

Connecting the Wiring Harness to the Outboard Motor

Locate the wiring harness connected to the Command Link multifunction meter and align it with the outboard motor’s wiring ports. Ensure all connectors are clean and free of corrosion. Match the wiring harness to the motor’s wiring diagram, typically found in the installation manual. Securely connect each terminal, following the color-coded wiring chart. Tighten all connections firmly to prevent loose wires. Double-check the wiring for any damage or misconnections before powering on the system. If unsure, consult a Yamaha dealer or a certified marine technician for assistance.

Installing the Command Link Plus or Helm Master

Begin by ensuring the Command Link Plus or Helm Master is compatible with your Yamaha outboard motor. Mount the unit securely in a visible and accessible location, following Yamaha’s installation guidelines. Connect the wiring harness to the designated ports on the Helm Master or Command Link Plus, ensuring all connections are tight and free of corrosion. Refer to the wiring diagram provided in the installation manual for specific instructions. Power on the system and test all functions to confirm proper operation. If integrating with other systems, ensure the network is properly configured. Consult a Yamaha dealer if assistance is needed for complex setups.

Configuration and Initial Setup

Press the SET button for 1 second to access default settings. Use the MODE button to navigate and configure initial parameters, ensuring proper system initialization and functionality.

Setting Up the Multifunction Meter’s Initial Settings

To configure the multifunction meter, press the SET button for 1 second to access the default settings. Use the MODE button to navigate through the menu options, selecting parameters like engine data, fuel level, or network settings. Ensure all configurations align with your boat’s specifications. After adjusting, press the SET button to save changes. Proper initialization ensures accurate data display and seamless system operation. Refer to the manual for specific guidance on customizing settings for optimal performance and compatibility with your Yamaha outboard motor and Command Link system.

Connecting to an NMEA 2000 Network

To connect your Yamaha Command Link system to an NMEA 2000 network, ensure compatibility with Yamaha outboard models from 2006 onward. Use the specified Yamaha 4-pin connector and adapter to establish the connection. Follow the network configuration instructions in the manual, ensuring proper cable installation and compatibility with other devices. Once connected, the multifunction meter will display data from compatible engines and devices. Verify the network status through the meter’s settings to ensure seamless communication. Refer to Yamaha’s guidelines for detailed setup instructions and troubleshooting tips to maintain optimal performance.

Integrating with Other Systems (e.g., Helm Master)

Integrating the Yamaha Command Link system with other components like Helm Master enhances control and functionality. Connect the multifunction meter to the Helm Master engine network for seamless communication. This integration allows access to advanced features such as trim and throttle control. Ensure the Helm Master is compatible with your Yamaha outboard motor and follow the network configuration instructions in the manual. Proper setup enables real-time data sharing and synchronized operation between systems. For twin outboard installations, use the specified switch panel to maintain optimal performance. Refer to Yamaha’s guidelines for detailed integration steps and troubleshooting tips to ensure a smooth setup.

Troubleshooting Common Issues

Identify and resolve issues by checking connections, consulting the manual, and ensuring compatibility. Verify wiring, reset settings, and update software if necessary for optimal performance and reliability.

Diagnosing Connection Problems

Diagnosing connection issues with the Yamaha Command Link system involves systematically checking wiring, connectors, and power supplies. Ensure all harness connections are secure and free from corrosion. Verify the 4-pin connector is properly attached to the outboard motor. Check the NMEA 2000 network configuration for compatibility and proper termination. Inspect the multifunction meter’s power supply and ground wires for integrity. Consult the installation manual for specific troubleshooting steps; If issues persist, resetting the system or updating the software may resolve the problem. Always refer to Yamaha’s guidelines for accurate diagnosis and repair.

Resolving Display Errors and Data Inconsistencies

Display errors and data inconsistencies on the Yamaha Command Link system can often be resolved by checking the multifunction meter’s settings and connections. Ensure the system is updated with the latest software version. Power cycling the system by turning it off and on may reset any temporary glitches. Verify that all sensors, such as speed and RPM, are functioning correctly. If issues persist, refer to the installation manual for recalibration procedures or resetting default settings. Additionally, ensure proper NMEA 2000 network integration to avoid data conflicts. Always follow Yamaha’s troubleshooting guidelines for accurate resolution. Regular system checks can prevent recurring issues.

Maintenance and Upkeep

Regularly inspect wiring and connections to ensure reliability. Update Command Link software periodically for optimal performance. Perform routine checks on sensors and multifunction meters for accuracy. Always refer to the Yamaha manual for detailed maintenance schedules to keep your system functioning smoothly and efficiently.

Routine Checks for Optimal Performance

Regularly inspect all wiring connections and harnesses for signs of damage or corrosion. Ensure the multifunction meter is securely mounted and free from obstructions. Check the NMEA 2000 network for proper connectivity and verify that all devices are communicating effectively. Update the Command Link software to the latest version for enhanced features and bug fixes. Test all gauges and sensors to ensure accurate readings. Refer to the Yamaha manual for specific maintenance schedules and procedures to maintain optimal system performance and reliability during boating operations. Address any issues promptly to prevent system malfunctions.

Updating Command Link Software

Regular software updates ensure your Yamaha Command Link system performs optimally. Visit the Yamaha website to check for the latest software version compatible with your system. Download the update to a compatible memory card or USB device. Follow the installation manual’s instructions to transfer the update to your multifunction meter. Use the meter’s menu to initiate the update process, ensuring the system is powered on and connected to a stable power source. After completion, restart the system and verify all features are functioning correctly. Always refer to Yamaha’s official guidelines for specific update procedures and troubleshooting tips. Keep your system up-to-date for enhanced functionality and reliability.

Frequently Asked Questions (FAQs)

  • Is the Command Link system compatible with all Yamaha outboards? Compatibility varies by model year and engine type; check Yamaha’s official compatibility chart.
  • What are the benefits of digital gauges? They offer precise data, customizable displays, and seamless integration with other systems for enhanced control and monitoring.
  • How do I repair or replace Command Link components? Contact authorized Yamaha dealers for genuine parts and follow the installation manual for proper replacement procedures.

Compatibility with Different Yamaha Outboard Models

Yamaha’s Command Link system is compatible with various outboard models, primarily those manufactured from 2006 onward. Engines like the F70, F60, and Z200 series are supported, ensuring seamless integration. For older models, compatibility depends on specific features and hardware. Users with 1995-2005 models may require additional adapters or updated components. Always consult Yamaha’s compatibility chart or the installation manual to confirm compatibility with your outboard motor. Proper setup ensures optimal performance and prevents potential issues. For newer models like the 2025 series, compatibility is guaranteed with the latest Command Link updates.

Advantages of Using Digital Gauges

Digital gauges offer enhanced visibility and precision compared to analog counterparts. They provide real-time data on engine performance, fuel levels, and system status. The multifunction meter displays critical information in a single interface, reducing clutter. Digital gauges are also more durable and require less maintenance. Their backlit screens improve readability in low-light conditions. Integration with NMEA 2000 networks allows for seamless connectivity with other marine electronics. Upgrading to digital gauges ensures better control and monitoring, enhancing overall boating safety and efficiency. This modern solution is a significant improvement for Yamaha outboard users seeking reliable performance.

Repair and Replacement Options

For repairs or replacements, Yamaha provides detailed manuals and part numbers for Command Link components. Users can access wiring diagrams and specific instructions for troubleshooting. The multifunction meter and wiring harness are key areas requiring attention. Replacing faulty sensors or connectors ensures optimal performance. Yamaha dealers offer genuine parts and technical support, while online forums provide community-driven solutions. Always refer to the official Yamaha service manual for accurate repairs. Regular maintenance and updates help prevent system issues, ensuring reliability and longevity of the Command Link system.

Continue Reading

powerless free pdf

Discover Lauren Roberts’ Powerless, the first entry in The Powerless Trilogy, combining YA fiction with romantasy․ Available as a free PDF download, it explores a world ruled by superpowered elites, blending intense drama with forbidden romance․ Access it now via Google Drive or by converting the EPUB version to PDF free of charge․

1․1 Overview of the Book and Its Popularity

Powerless, written by Lauren Roberts, is a gripping young adult romantasy that immerses readers in the brutal kingdom of Ilya, where superpowered elites dominate․ The book’s intense drama, forbidden romance, and intricate world-building have captivated readers, making it a popular choice in YA fiction․ Its availability as a free PDF has further boosted its reach and appeal among fantasy and romance enthusiasts․

1․2 Sources for Downloading “Powerless” in PDF Format

Powerless by Lauren Roberts is available as a free PDF download through various sources․ Google Drive folders, such as this link, offer direct access to the file․ Additionally, EPUB versions can be easily converted to PDF using free online converters, ensuring readers can enjoy the book in their preferred format without any cost․

Key Themes and Genres in “Powerless”

Powerless blends young adult fiction, romance, and fantasy, exploring themes of power struggles and forbidden relationships in a world dominated by superpowered elites․ The story captivates readers with its intense drama and emotional depth, making it a compelling read for fans of romantasy and dystopian narratives․

2․1 Young Adult Fiction and Romantic Elements

Powerless is a captivating young adult novel that seamlessly blends romantic elements with a fantastical setting․ The story focuses on the tumultuous relationship between Paedyn and Kais, set against the backdrop of a brutal kingdom ruled by superpowered elites․ The emotional depth and forbidden romance captivate readers, making it a standout in the YA fiction genre․ Download the free PDF to experience this thrilling tale․

2․2 Fantasy and Superpowered Elites in the Story

Powerless is set in the kingdom of Ilya, where superpowered elites dominate society․ These elites possess extraordinary abilities, creating a stark contrast between the ruling class and the ordinary citizens․ The story delves into themes of power imbalance and control, offering a rich fantasy backdrop that enhances the narrative’s tension and conflict․ Download the free PDF to explore this immersive world․

The Powerless Trilogy by Lauren Roberts

Lauren Roberts’ Powerless Trilogy captivates readers with its blend of young adult fiction and romantasy․ The series explores themes of power, control, and forbidden relationships, set in a dystopian world ruled by superpowered elites․ The trilogy’s first book, Powerless, introduces characters like Paedyn and Kais, whose tumultuous bond drives the story․ Fans eagerly await the next installments, building on the intense drama and fantasy elements established in the first book․

3․1 Structure and Sequence of the Trilogy

The Powerless Trilogy by Lauren Roberts is structured as a three-book series, with each installment building on the previous one․ The first book, Powerless, introduces the dystopian world of Ilya and the complex relationships between its characters․ The subsequent books expand on the power struggles and romantic tensions, culminating in a climactic conclusion․ The trilogy is designed to keep readers engaged with its sequential storytelling and character development․

3․2 Main Characters and Their Relationships

The trilogy centers around Paedyn and Kais, whose tumultuous relationship drives the story’s emotional core․ Paedyn, a powerless protagonist, navigates a world of superpowered elites, while Kais, an enigmatic figure, harbors secrets that complicate their bond․ Supporting characters like Lira and Thane add depth, with alliances and rivalries shaping the narrative․ Their interactions explore themes of trust, loyalty, and forbidden romance, keeping readers invested in their journeys․

Author Background: Lauren Roberts

Lauren Roberts is renowned for her captivating YA romantasy novels, blending intense drama with forbidden romance․ Her writing style immerses readers in complex characters and immersive worlds, especially in The Powerless Trilogy․

4․1 Biography and Writing Style

Lauren Roberts is a rising star in YA literature, known for her unique blend of fantasy, romance, and intense drama․ Her writing captivates readers with intricate world-building and complex characters․ Powerless showcases her ability to weave forbidden romance and political intrigue, creating a compelling narrative that draws readers into the brutal kingdom of Ilya․ Her style is both immersive and emotionally charged․

4․2 Reception of Her Work in the Literary Community

Lauren Roberts’ Powerless has garnered widespread acclaim for its fresh take on YA fiction, blending romance with dystopian fantasy․ Critics praise her vivid storytelling and the depth of her characters, particularly the tumultuous relationship between Paedyn and Kais․ Fans and reviewers alike commend her ability to create a world that feels both familiar and unique, solidifying her place in the romantasy genre․

“Powerless” by Matthew Cody: A Different Perspective

Explore Matthew Cody’s Powerless, a gripping young adult novel set in Nobles Green, where children discover their superpowers․ Available as a free PDF download here․

5․1 Plot Summary and Key Differences

Matthew Cody’s Powerless is set in Nobles Green, where children uncover their hidden superpowers․ Unlike Lauren Roberts’ version, this story focuses on young protagonists and their struggle to control their abilities․ The novel explores themes of power and identity, offering a fresh, youth-centric perspective․ Available as a free PDF download, it provides a unique take on the superpowered genre, appealing to fans of coming-of-age tales․

5․2 Themes of Power and Control in the Story

In Powerless by Matthew Cody, themes of power and control are central, exploring how superpowered elites rule and oppress others․ The story delves into internal conflicts, moral dilemmas, and the struggle for justice․ It examines the corrupting influence of power and the resilience of the powerless, offering a compelling narrative on authority and resistance, available as a free PDF for readers worldwide․

Where to Find “Powerless” for Free

Access Powerless by Lauren Roberts as a free PDF through platforms like Google Drive or by converting the EPUB version to PDF at no cost․

6․1 Google Drive and File-Sharing Platforms

Google Drive and other file-sharing platforms offer convenient access to Powerless in PDF format․ Users can download the book for free from shared folders, such as this link, without any subscription or payment․ These platforms provide a straightforward way to obtain the novel, ensuring easy access for readers worldwide․

6․2 Epub to PDF Conversion Options

Convert Powerless from EPUB to PDF using free online tools, ensuring compatibility with your preferred reading format․ This method allows readers to access the novel in PDF without direct download restrictions․ Simply upload the EPUB file to a reliable converter and download the PDF version, maintaining the book’s original formatting and readability․

The Powerless Trilogy: Book Series Overview

The Powerless Trilogy by Lauren Roberts is a captivating YA romantasy series set in a brutal kingdom ruled by superpowered elites․ The trilogy combines intense drama, forbidden romance, and epic battles, offering readers a thrilling narrative․ Fans can access the first book, Powerless, for free in PDF format, immersing themselves in its gripping world․

7․1 Book 1: “Powerless” by Lauren Roberts

Powerless by Lauren Roberts is the captivating first installment of The Powerless Trilogy․ This young adult romantasy throws readers into the brutal kingdom of Ilya, where superpowered elites rule with an iron fist․ The story follows the tumultuous relationship between Paedyn and Kais, blending forbidden romance, intense drama, and epic battles․ Available as a free PDF download, it sets the stage for a thrilling series․

7․2 Subsequent Books in the Trilogy

Following the success of Powerless, Lauren Roberts continues the saga with two more installments; Book 2 and Book 3 delve deeper into the power struggles of Ilya, expanding on Paedyn and Kais’ complex relationship․ These books maintain the thrilling mix of romance, fantasy, and drama, while introducing new challenges and alliances․ Fans eagerly anticipate the conclusion, with all books available as free PDF downloads for uninterrupted reading․

Main Characters in “Powerless”

Meet Paedyn and Kais, whose tumultuous relationship shapes the story․ Their struggles and dynamics with supporting characters drive the narrative, enriching the world of The Powerless Trilogy․

8․1 Paedyn and Kais: A Tumultuous Relationship

Paedyn and Kais’s relationship in Powerless is complex and volatile, set against the backdrop of the oppressive kingdom of Ilya․ Their bond, filled with tension and forbidden attraction, drives the plot and explores themes of power and control․ Their interactions create emotional depth, making them central to the story’s progression and the trilogy’s appeal․

8․2 Supporting Characters and Their Roles

Supporting characters in Powerless add depth and complexity to the narrative․ They include allies and adversaries who influence Paedyn and Kais’s journey, shaping their decisions and the story’s trajectory․ These characters often represent different factions within the kingdom of Ilya, contributing to the world-building and thematic exploration of power, loyalty, and rebellion․

Plot Summary and Key Events

Powerless unfolds in the kingdom of Ilya, where superpowered elites dominate․ The story follows a protagonist grappling with powerlessness, uncovering secrets that ignite a struggle for control and rebellion․

9․1 The Kingdom of Ilya and Its Elite Rulers

The kingdom of Ilya is a brutal realm ruled by superpowered elites who maintain control through fear and oppression․ These elites possess extraordinary abilities, enforcing their dominance over the powerless majority․ The rigid class divide fuels tension, setting the stage for rebellion and power struggles that drive the narrative forward․

9․2 The Struggle for Power and Control

The heart of Powerless lies in its exploration of power dynamics․ The story delves into the tense struggle between the ruling elites and the oppressed, with characters like Paedyn and Kais navigating a world where control is everything․ Their tumultuous relationship mirrors the broader conflict, as they confront their own desires for power and the cost of rebellion in a ruthless kingdom․

The Future of the Powerless Trilogy

The Powerless Trilogy is highly anticipated to expand, with upcoming releases and potential adaptations․ Fans eagerly await new installments and exciting possibilities for the series’ growth․

10․1 Upcoming Releases and Fan Expectations

Fans eagerly anticipate the next installment of The Powerless Trilogy, with rumors of a gripping continuation․ The story’s potential for character growth and plot twists has ignited excitement․ Readers hope for deeper exploration of Paedyn and Kais’ relationship and the fate of the kingdom․ The series’ success has fans speculating about future adaptations, further expanding its reach and impact․

10․2 Potential Adaptations and Spin-offs

The success of Powerless has sparked interest in potential adaptations, with fans envisioning a TV or film series․ Its captivating world and complex characters make it ideal for screen adaptation․ Additionally, the story’s rich universe offers opportunities for spin-offs, such as exploring the origins of the Elite system or delving into supporting characters’ backstories, further expanding the franchise’s reach and fan engagement․

Reader Reception and Reviews

Powerless has garnered enthusiastic reader feedback, with fans praising its compelling character dynamics and emotional depth․ High ratings highlight its unique storytelling, making it a must-read for YA enthusiasts․

11․1 Fan Feedback and Ratings

Fans rave about Powerless, praising its intense character dynamics, particularly Paedyn and Kais’ relationship․ High ratings reflect its emotional depth and unique storytelling․ Readers commend Lauren Roberts’ ability to craft relatable characters and a gripping plot, making it a standout in YA literature․ The free PDF availability has further boosted its popularity among enthusiasts seeking compelling reads․

11․2 Critical Acclaim and Recommendations

Critics acclaim Powerless for its unique storytelling and emotional depth․ Reviewers highlight Lauren Roberts’ ability to weave fantasy with romance, creating a compelling narrative․ The book is often recommended for fans of YA fiction and romantasy․ Its availability as a free PDF has further boosted its accessibility, making it a widely shared and favored read among enthusiasts and critics alike․

Continue Reading

jeny’s surprisingly stretchy bind-off written instructions

Jeny’s Surprisingly Stretchy Bind-Off is a popular, elastic technique perfect for sweaters, hats, and socks. Created by Jeny Staiman, it offers a neat finish and easy learning curve.

Overview of the Technique

Jeny’s Surprisingly Stretchy Bind-Off is a versatile and elastic method perfect for projects requiring flexibility, like sweaters, hats, and socks. It uses a reverse yarn over technique to create a stretchy edge while maintaining a clean finish. The method works seamlessly on ribbing, stockinette, or garter stitch, making it adaptable to various knitting projects. Unlike traditional bind-offs, it allows for ease of movement without compromising the structure of the garment. This technique is ideal for knitters seeking a balance between elasticity and a polished appearance, making it a go-to choice for many modern knitting patterns.

Why This Bind-Off is Popular Among Knitters

Knitters adore Jeny’s Surprisingly Stretchy Bind-Off for its exceptional elasticity, making it ideal for garments like sweaters, hats, and socks that require flexibility. Unlike traditional methods, it avoids tightness while maintaining a clean finish. The technique’s simplicity and ease of learning appeal to knitters of all skill levels. Its versatility across ribbing, stockinette, and garter stitch ensures consistency and reduces the need to learn multiple methods. Additionally, the neat, professional edge it provides enhances the overall appearance of projects, making it a trusted choice in the knitting community.

Step-by-Step Written Instructions

Begin by working a reverse yarn over, then knit one stitch. Next, lift the yarn over and bind off, repeating this process for a seamless, elastic edge.

Binding Off Knit Stitches

To bind off knit stitches using Jeny’s method, start by working a reverse yarn over (wrap the yarn clockwise around the right needle). Knit the first stitch as usual. Next, lift the yarn over and bind it off by pulling it over the knitted stitch. Repeat this process, ensuring each yarn over is worked backward before knitting the next stitch. This creates a stretchy, elastic edge perfect for garments needing flexibility, like sweater bottoms or sleeves. Adjust your needle size if needed to maintain even tension and a neat appearance.

Binding Off Purl Stitches

For purl stitches, begin by working a standard yarn over (front to back over the right needle). Purl the first stitch as usual. Next, lift the yarn over and bind it off by pulling it over the purled stitch. Continue this process, ensuring each yarn over is worked in the usual direction before purling the next stitch. This method maintains the stretch and elasticity of the bind-off while keeping the edge neat. Use a smaller needle if needed to achieve the desired tension and avoid flaring, ensuring a professional finish for your knitting projects.

Pro Tips for Mastering the Technique

Use a smaller needle to prevent flaring, maintain even tension, and practice the backward yarn over for consistent results. Avoid over-tightening to preserve elasticity and neatness.

Handling Yarn Overs Effectively

Mastering yarn overs is key to Jeny’s Stretchy Bind-Off. Start by creating a backward yarn over (clockwise wrap) before knitting or purling the next stitch. Use your index finger to gently pin the yarn over in place, ensuring it doesn’t slip. This technique prevents the yarn from twisting and maintains even tension. Avoid pulling the yarn too tightly, as this can restrict elasticity. For purl stitches, work a forward yarn over (counterclockwise wrap) before purling. Consistent yarn over management ensures a smooth, stretchy edge. Practice this step to achieve professional-looking results.

Adjusting Tension for Perfect Results

Proper tension is crucial for Jeny’s Stretchy Bind-Off. To avoid a too-tight or overly loose edge, use a needle size smaller than your project needle—often half the size. This ensures the bind-off lies flat while maintaining elasticity. Avoid over-tightening stitches, as this can restrict stretch. If stitches feel too loose, try a slightly smaller needle. For sweaters or sleeves, test the tension on a swatch to ensure a smooth, even edge. The goal is a balanced tension that allows the fabric to stretch comfortably without flaring. Adjust as needed for your project’s specific needs.

Best Applications for Jenys Stretchy Bind-Off

Jeny’s Stretchy Bind-Off is ideal for projects requiring elasticity, such as sweaters, sleeves, hats, socks, and baby booties, ensuring a comfortable and flexible finish.

Using It for Sweaters and Sleeves

Jeny’s Stretchy Bind-Off is a favorite for sweaters and sleeves due to its exceptional elasticity and neat finish. It prevents tightness at the bottom edges while maintaining shape. Using a smaller needle size, as recommended, ensures a clean look without compromising stretch. This method is particularly effective for garments requiring ease of movement, such as sweaters with fitted silhouettes or sleeves that need flexibility. The technique works beautifully with stockinette stitch, ribbing, or garter stitch, making it versatile for various knitting projects. Its subtle texture and memory retention make it ideal for everyday wear.

Perfect for Hats, Socks, and Baby Booties

Jeny’s Surprisingly Stretchy Bind-Off is ideal for hats, socks, and baby booties, where flexibility is essential. The elastic nature ensures a comfortable fit, especially for items like toe-up socks and tightly fitted hats. The technique’s subtle texture blends seamlessly with ribbing, making it perfect for baby booties and other small projects. Its ease of use and memory retention ensure garments stretch and recover well, maintaining their shape over time. Knitters love this method for its reliability and professional finish, making it a go-to for projects requiring both stretch and durability.

Troubleshooting Common Issues

Tight stitches and yarn over mistakes are common. Using a smaller needle can help achieve a stretchy yet neat edge without flaring or losing shape over time.

Dealing with Tight Stitches

Tight stitches can occur if the yarn overs are pulled too tightly. To fix this, try using a needle size smaller than your working needle for the bind-off. This allows the edge to remain stretchy while maintaining a clean look. Additionally, avoid over-tightening the stitches as you work. If the bind-off feels too rigid, blocking the finished project can help relax the stitches and restore elasticity. Experimenting with needle sizes and tension will help achieve the perfect balance between stretch and structure.

Fixing Yarn Over Mistakes

If a yarn over is dropped or misaligned, it can create unevenness. To fix this, gently remove the stitch from the needle and reinsert it, ensuring the yarn over is correctly positioned. For backwards yarn overs, use your index finger to pin the yarn in place while knitting or purling the next stitch. If a yarn over is missed, insert the needle into the stitch below and pull the yarn up to recreate the over. Always work slowly and keep tension even to maintain the bind-off’s elasticity and neat appearance.

About the Creator: Jeny Staiman

Jeny Staiman is a mom, usability engineer, and passionate knitter with 15+ years of experience. She specializes in socks, hats, and gloves, creating practical, versatile techniques like her iconic stretchy bind-off method.

Her Contribution to Knitting

Jeny Staiman revolutionized knitting with her Surprisingly Stretchy Bind-Off, a technique combining elasticity and neatness. Her method, ideal for sweaters, hats, and socks, ensures comfort and professional finishes. As a usability engineer and knitter, Jeny’s practical approach has empowered crafters worldwide, making her a beloved figure in the knitting community. Her techniques are celebrated for simplicity, versatility, and effectiveness, inspiring countless projects and fostering creativity among knitters of all skill levels.

Other Techniques and Patterns by Jeny

Beyond her iconic bind-off, Jeny Staiman has contributed to various knitting patterns and techniques, particularly in accessories like socks, hats, and gloves. Her work often blends functionality with creativity, catering to knitters seeking practical yet stylish designs. Jeny is also known for her tutorials and articles that simplify complex knitting concepts. Her exploration of moebius knitting and mathematical forms showcases her innovative approach. By sharing her knowledge, Jeny has become a trusted resource for knitters worldwide, inspiring both beginners and experienced crafters with her accessible and imaginative designs.

Jeny’s Surprisingly Stretchy Bind-Off is a versatile and elastic technique ideal for projects requiring flexibility. For further learning, explore tutorials on Cocoknits and Nimble-Needles, offering detailed guides and patterns.

Final Tips for Success

Mastering Jeny’s Stretchy Bind-Off requires attention to tension and stitch handling. Use a smaller needle for a neater edge and avoid over-tightening stitches. When working with yarn overs, pin them with your index finger to maintain control. For smaller gauge yarns, slipping stitches one at a time can simplify the process. Practice on swatches before applying it to projects like sweaters or socks. This method ensures a stretchy, durable finish, making it ideal for garments requiring flexibility. With patience, it becomes a go-to technique for knitters seeking elastic edges.

Recommended Tutorials and Patterns

For a seamless learning experience, explore tutorials like Cocoknits’ detailed guide with step-by-step images and written instructions. Knitty’s original article by Jeny Staiman provides a comprehensive overview. Nimble Needles offers an animated GIF tutorial, perfect for visual learners. Additionally, patterns like the Franca sweater and Mabel sweater showcase this bind-off in action. For practice, try swatches or small projects like hats or socks. These resources ensure mastery of Jeny’s technique, making it a versatile tool for any knitter seeking elastic, professional finishes.

Continue Reading

the deathly hallows pdf

The Deathly Hallows PDF is a widely sought-after digital version of J.K. Rowling’s final Harry Potter installment, offering fans convenient access to the epic conclusion. Its popularity stems from the gripping storyline, exploring themes of mortality and the Hallows’ significance, while also fueling debates among fans about the Hallows’ role versus the Horcruxes. The PDF format enhances readability, making it a preferred choice for many readers worldwide.

Overview of the Book and Its Significance

The Deathly Hallows, the seventh installment in J.K. Rowling’s Harry Potter series, is a monumental conclusion to the saga, exploring profound themes of death, sacrifice, and destiny. The book follows Harry, Ron, and Hermione as they uncover the mysteries of the Deathly Hallows and the Horcruxes, leading to a climactic battle. Its significance lies in its emotional depth, character development, and the resolution of long-standing plot threads. The PDF version of the book has become popular for its accessibility, allowing readers to revisit the magical world effortlessly. It remains a cultural phenomenon, resonating with fans for its universal themes and masterful storytelling.

Why the Deathly Hallows PDF is Popular Among Readers

The Deathly Hallows PDF is popular due to its convenience and accessibility, allowing fans to revisit the magical world of Harry Potter effortlessly. Readers appreciate the ability to carry the entire book on digital devices, making it ideal for on-the-go reading. The PDF format ensures crisp text and clear formatting, enhancing the reading experience. Additionally, the digital version appeals to environmentally conscious readers who prefer e-books over physical copies. Its widespread availability online has also made it a favorite among fans seeking a quick and easy way to enjoy the story. This accessibility has further cemented its place in the hearts of Harry Potter enthusiasts worldwide.

The Deathly Hallows: Key Plot Elements

The Deathly Hallows PDF delves into Harry, Ron, and Hermione’s perilous quest, uncovering the Hallows’ origins from Death’s magic, their purpose as inventions addressing mortality, and their contrast with Horcruxes.

The Concept of the Deathly Hallows

The Deathly Hallows are three legendary magical objects created by Death herself, as recounted in The Tale of the Three Brothers. These items—the Elder Wand, the Resurrection Stone, and the Cloak of Invisibility—were crafted using the magic of Death’s veil. Each Hallow represents a unique philosophy on overcoming death: the Elder Wand symbolizes power, the Resurrection Stone embodies the desire to reunite with loved ones, and the Cloak of Invisibility signifies humility and avoidance of death. They are not tools for immortality but inventions born from the Peverell brothers’ attempts to defy death. Together, they form a central mystery in the story, influencing Harry’s journey and the ultimate battle against Voldemort.

The Quest for the Horcruxes

Harry, Ron, and Hermione embark on a perilous journey to locate and destroy Voldemort’s Horcruxes, objects containing fragments of his soul that grant him immortality. Guided by Dumbledore’s cryptic clues and their own resourcefulness, they decipher the mysteries of the Horcruxes. From the locket to Nagini, the snake, each Horcrux is hidden in treacherous locations, testing their resolve and unity. The quest demands immense courage and sacrifice, as they face internal conflicts and external dangers. Their mission is central to the story, as destroying all Horcruxes is the only way to defeat Voldemort and restore peace to the wizarding world.

The Role of the Elder Wand, Resurrection Stone, and Cloak of Invisibility

The Deathly Hallows PDF delves into the significance of the Elder Wand, Resurrection Stone, and Cloak of Invisibility, each tied to the Peverell brothers’ quest to master death. The Elder Wand, a weapon of unparalleled power, is central to Voldemort’s dominance. The Resurrection Stone, capable of summoning spirits, symbolizes the longing to reconnect with the deceased, while the Cloak of Invisibility, passed down through the Potters, represents protection and legacy. Together, these Hallows encapsulate the themes of power, loss, and love, shaping Harry’s understanding of his destiny and the ultimate confrontation with Voldemort. Their roles intertwine fate and choice, defining the story’s climax.

Themes and Symbolism in the Deathly Hallows

The Deathly Hallows PDF explores profound themes of life, death, and sacrifice, with the Hallows symbolizing humanity’s eternal quest to transcend mortality and find ultimate protection.

The Struggle Between the Hallows and Horcruxes

The Deathly Hallows PDF highlights the philosophical clash between the Hallows and Horcruxes, symbolizing two contrasting approaches to immortality. The Hallows—Elder Wand, Resurrection Stone, and Cloak of Invisibility—represent humanity’s desire to transcend death through mastery and protection. In contrast, Horcruxes embody Voldemort’s obsession with immortality through the fragmentation of the soul. This duality underscores the moral and ethical dilemmas faced by Harry, as he grapples with the temptation of the Hallows while ultimately recognizing the futility of seeking power over death. The struggle between these concepts serves as a poignant exploration of life, sacrifice, and the true meaning of immortality, deeply resonating with readers worldwide.

The Theme of Death and Immortality

The Deathly Hallows PDF delves deeply into the theme of death and immortality, exploring it through Harry’s journey and the broader wizarding world. Harry’s encounters with death, from the loss of loved ones to his own willingness to sacrifice himself, underscore the inevitability and acceptance of death. The Resurrection Stone, a central Hallow, symbolizes the longing to reconnect with the deceased but also highlights the futility of clinging to the past. Meanwhile, Voldemort’s Horcruxes represent an unnatural pursuit of immortality, contrasting sharply with Harry’s ultimate embrace of mortality. This duality underscores the book’s poignant message: true immortality lies not in avoiding death but in the enduring power of love and legacy.

The Power of Love and Sacrifice

The Deathly Hallows PDF underscores the transformative power of love and sacrifice, central to Harry’s journey. Lily Potter’s ultimate sacrifice for her son becomes a recurring motif, as her love protects Harry and ultimately aids in Voldemort’s defeat. Harry himself embodies this theme, willing to sacrifice his life to destroy the Horcrux within him, demonstrating the depth of his love for others. The bonds of friendship and loyalty among Harry, Ron, and Hermione further illustrate how love and sacrifice drive their quest. These acts of devotion highlight the enduring strength of love, proving it to be the most potent force against darkness and the key to the story’s resolution.

Character Development and Relationships

The Deathly Hallows PDF delves into the profound growth of Harry, Ron, and Hermione, showcasing their unwavering friendship and resilience. Dumbledore’s wisdom and Snape’s redemption highlight the complexity of their bonds, while the trio’s shared struggles deepen their trust and loyalty, ultimately shaping the story’s emotional core.

Harry, Ron, and Hermione’s Journey

Harry, Ron, and Hermione’s journey in the Deathly Hallows PDF is marked by their relentless pursuit of Horcruxes, testing their friendship and resolve. As they navigate a world increasingly dominated by Voldemort, the trio faces moral dilemmas, personal sacrifices, and the weight of their mission. Their bond strengthens as they rely on each other for survival, while individual growth is evident in their bravery and wisdom. The discovery of the Deathly Hallows adds complexity to their quest, forcing them to confront the true nature of power and immortality. Their journey ultimately becomes a testament to loyalty, love, and the enduring power of unity in the face of darkness.

The Role of Dumbledore and Snape

Dumbledore’s wisdom and foresight play a crucial role in guiding Harry, even after his death, as his teachings illuminate the path to understanding the Hallows and Horcruxes. Meanwhile, Snape’s complex journey as a double agent for the Order of the Phoenix showcases his unwavering loyalty to Dumbledore’s mission. His protection of Harry, despite outward hostility, is pivotal in the ultimate defeat of Voldemort. Together, their actions underscore the themes of redemption and the power of love, leaving a lasting impact on the story’s resolution.

The Impact of the Deathly Hallows on Character Arcs

The Deathly Hallows profoundly shapes the character arcs of Harry, Ron, and Hermione, pushing them to confront their deepest fears and beliefs. Harry’s journey evolves from a boy seeking vengeance to a selfless hero willing to sacrifice himself for others. The Hallows and Horcruxes challenge his understanding of destiny and morality, ultimately defining his legacy. Hermione grows into a resilient leader, while Ron faces insecurities and emerges stronger. The quest tests their bonds and individual strengths, leading to transformative growth. The Hallows’ influence forces them to question their priorities, resulting in a poignant exploration of courage, love, and the true meaning of immortality.

Reception and Legacy of the Deathly Hallows

The Deathly Hallows received widespread acclaim, solidifying its place as a cultural phenomenon. Its profound themes and emotional depth resonated globally, leaving a lasting impact on readers and the wizarding world.

Popularity and Critical Acclaim

The Deathly Hallows PDF has achieved remarkable popularity and critical acclaim. As the final installment in the Harry Potter series, it concludes Harry’s journey, resonating deeply with fans. The book was a bestseller, and its film adaptation became the highest-grossing of 2011. Critics praised its emotional depth and satisfying resolution. Fans appreciated the closure it provided, tying up loose ends and delivering a poignant conclusion. The PDF format has enhanced accessibility, allowing readers worldwide to engage with the story conveniently. This widespread acclaim solidifies its place as a beloved and impactful conclusion to the series.

Impact on the Harry Potter Fandom

The Deathly Hallows PDF has profoundly impacted the Harry Potter fandom, fostering deeper engagement and discussion among fans. The book’s intricate plot and emotional conclusion sparked widespread debate, particularly about the Hallows’ significance versus the Horcruxes. Fans found the PDF format convenient for re-reading and analyzing key moments, enhancing their connection to the story. The final installment united the community, as readers worldwide shared theories and reflections. The PDF’s accessibility has ensured that the story remains a central topic in fan circles, solidifying its legacy as a pivotal moment in the Harry Potter saga. Its influence continues to shape fan creativity and enthusiasm.

Cultural Significance of the Deathly Hallows

The Deathly Hallows holds immense cultural significance as the culmination of the Harry Potter series, shaping modern fantasy literature and pop culture. Its exploration of themes like mortality, sacrifice, and the battle between good and evil resonated globally, transcending age boundaries. The book’s release sparked widespread discussions, inspiring fan art, theories, and community engagement. The story’s universal themes transformed it into a cultural phenomenon, influencing films, merchandise, and fandom activities. Its impact extends beyond entertainment, reflecting deeper human values and philosophical questions, making it a timeless narrative in contemporary culture. The Deathly Hallows PDF has further amplified its reach, ensuring its legacy endures digitally.

The Deathly Hallows PDF: Availability and Accessibility

The Deathly Hallows PDF is readily available online, offering fans easy access to the beloved story. Its availability on digital platforms ensures that readers worldwide can enjoy the tale seamlessly.

Where to Find the Deathly Hallows PDF

The Deathly Hallows PDF can be found on various online platforms, including official retailers like Amazon Kindle and Pottermore. Additionally, libraries and eBook services often offer digital copies. Fans can also locate it through authorized book websites, ensuring a legal and high-quality download. Availability on these platforms makes it easily accessible to readers worldwide, allowing them to enjoy the story seamlessly. Always opt for authorized sources to avoid unauthorized versions and support the authors and publishers.

Advantages of Reading the PDF Version

Reading the Deathly Hallows in PDF format offers numerous advantages, including convenience and portability. The digital version is lightweight and easily accessible on multiple devices, such as tablets, smartphones, and e-readers. This makes it ideal for readers who prefer carrying their books digitally. Additionally, the PDF allows for adjustable text size and night mode, enhancing readability in various lighting conditions. The ability to search for specific phrases or quotes within the text is another significant benefit, making it easier for fans to analyze or reference key moments. Overall, the PDF version provides a flexible and modern way to experience the story while preserving the original content’s magic.

Challenges and Controversies Surrounding the PDF

The Deathly Hallows PDF has faced challenges, particularly regarding piracy and copyright infringement. Unauthorized distributions have led to legal disputes, as they undermine the intellectual property rights of J.K. Rowling and publishers. Additionally, the quality of some PDF versions can be inconsistent, with formatting issues or missing content, which may disappoint readers. There are also concerns about malware risks from downloading PDFs from unverified sources. Furthermore, debates arise within the fan community about the ethics of accessing the book digitally without purchasing it, sparking discussions on supporting authors versus convenience. These issues highlight the complexities surrounding digital access to popular literature.

Continue Reading

nikon coolpix l830 user manual

The Nikon Coolpix L830 is a compact digital camera designed for versatility, offering 16․0 million pixels and a 1/2․3-in․ CMOS sensor for crisp imagery․

1․1 Overview of the Camera

The Nikon Coolpix L830 is a compact digital camera designed for casual photographers seeking ease and versatility․ It features a 16․0-megapixel CMOS sensor, capturing vibrant images with excellent detail․ Equipped with a 3-inch LCD monitor, it offers a clear preview and playback experience․ The camera boasts a 34x optical zoom, ideal for distant subjects․ Weighing just 10․6 ounces, it’s portable and user-friendly․ With automatic modes and scene selections, it caters to beginners while offering manual controls for advanced users․ Though discontinued, its affordability and performance make it a popular choice among photography enthusiasts․

1․2 Key Features and Specifications

The Nikon Coolpix L830 features a 16․0-megapixel CMOS sensor, delivering sharp and vibrant images․ It boasts an impressive 34x optical zoom, perfect for capturing distant subjects․ The camera includes a 3-inch LCD monitor for easy previewing and reviewing of photos and videos․ Weighing just 10․6 ounces, it’s lightweight and portable․ Powered by a rechargeable Li-ion battery, it supports SD, SDHC, and SDXC memory cards for ample storage․ Although discontinued, its affordability and robust features make it a popular choice for casual photographers seeking a balance between simplicity and functionality․

Unboxing and Initial Setup

The Nikon Coolpix L830 comes with a camera, battery, charger, USB cable, and wrist strap․ Initial setup involves charging the battery and inserting a memory card․

2․1 What’s Included in the Box

The Nikon Coolpix L830 box includes the camera, a rechargeable Li-ion battery (EN-MH2), a battery charger (MH-72P1), a USB cable (UC-E21), a wrist strap, and a Quick Start Guide․ Additional items like a memory card are not included and must be purchased separately․ The camera is ready for use once the battery is charged and the memory card is inserted․ Ensure all accessories are accounted for before initial setup to avoid delays․

2․2 Charging the Battery and Inserting the Memory Card

To prepare your Nikon Coolpix L830 for use, begin by charging the included EN-MH2 battery using the provided MH-72P1 charger․ Connect the charger to a power source and allow it to charge fully, which typically takes about 2 hours․ Next, insert a compatible memory card (SD, SDHC, or SDXC) into the camera’s card slot, located on the bottom․ Ensure the camera is turned off before inserting the card․ Gently push the card into the slot until it clicks securely into place․ Once charged and equipped with a memory card, your camera is ready for operation․

Basic Camera Operations

Mastering the essential functions of the Nikon Coolpix L830 ensures a smooth photography experience, allowing you to capture and review photos and videos effortlessly․

3․1 Turning the Camera On and Off

To turn the Nikon Coolpix L830 on, locate the power button on the top of the camera and press it until the monitor lights up․ The camera will boot up and be ready to use in a few seconds․ To turn it off, press and hold the same power button until the monitor turns off․ Ensure the lens cap is removed when turning the camera on to avoid any obstruction․ Regularly turning the camera off when not in use helps conserve battery life․ Always use the power button to avoid sudden shutdowns or potential damage to the device․

3․2 Navigating the Menu System

The Nikon Coolpix L830 features an intuitive menu system that allows users to adjust settings and customize their shooting experience․ To access the menu, press the Menu button located on the camera’s rear․ Use the up and down arrow buttons to scroll through options, and the OK button to select a setting․ The left and right arrows can be used to adjust values in some menus․ To exit the menu, press the Menu button again or half-press the shutter release․ The menu is divided into shooting, playback, and setup categories, making it easy to find specific features․ Use the Zoom lever to quickly access common settings like ISO or white balance․ Always refer to the on-screen instructions for guidance․

Shooting Modes and Settings

The Nikon Coolpix L830 offers versatile shooting modes, including Auto Mode for simplicity, Scene Modes for specific situations, and Manual Controls for advanced users to customize settings․

4․1 Auto Mode for Beginners

The Auto Mode on the Nikon Coolpix L830 simplifies photography for newcomers․ This mode automatically adjusts settings like exposure, focus, and ISO to capture well-balanced images in various lighting conditions․ Users can simply point and shoot, leaving the technical details to the camera․ It’s ideal for casual snapshots and ensures vibrant colors and sharp details․ The camera also handles noise reduction and white balance, making it easy to achieve professional-looking results without manual adjustments․ This mode is perfect for beginners who want to focus on composition and creativity while learning the basics of photography․

4․2 Scene Modes for Specific Situations

The Nikon Coolpix L830 offers Scene Modes tailored for specific shooting scenarios, such as portraits, landscapes, night portraits, and close-ups․ These modes optimize settings like exposure, ISO, and focus for the best results․ For example, the Portrait Mode softens backgrounds to emphasize subjects, while Landscape Mode enhances detail and color in distant scenes․ Night Mode reduces blur and noise in low-light conditions․ Users can select from a variety of predefined modes to match their shooting environment, ensuring captures are sharp and vibrant without manual adjustments․ This feature is ideal for photographers who want to adapt to different situations effortlessly․

4․3 Manual Controls for Advanced Users

The Nikon Coolpix L830 offers Manual Controls for advanced photographers, providing precise control over settings like ISO, white balance, and focus․ Users can adjust exposure compensation to fine-tune brightness and contrast․ The camera also features manual focus mode, allowing for pinpoint accuracy in framing subjects․ Additionally, the ability to customize settings ensures flexibility in various lighting conditions․ These advanced controls enable photographers to experiment creatively and achieve their desired results without relying on automatic modes․ The manual controls are intuitive, making it easy for experienced users to optimize their shots for professional-quality outcomes․

Video Recording Capabilities

The Nikon Coolpix L830 supports HD video recording at 1080p resolution with a smooth frame rate of 30fps, ensuring high-quality and clear video capture with optical zoom functionality․

5․1 HD Video Recording Features

The Nikon Coolpix L830 offers HD video recording at 1080p resolution with a smooth 30fps frame rate, ensuring high-quality footage․ It supports optical zoom during recording, allowing you to capture distant subjects without losing clarity․ A dedicated video button makes it easy to start and stop recording instantly․ The camera also features image stabilization to minimize camera shake and ensure smooth video capture․ Videos are recorded in MOV format with H․264 compression, providing efficient file sizes while maintaining quality․ Additionally, the L830 includes a time-lapse feature for creative interval shooting, perfect for capturing dynamic scenes like sunsets or cloud movements․

Playback and Editing

The Nikon Coolpix L830 allows users to review and edit photos and videos directly on the camera․ Features include deleting, organizing, and enhancing images with a user-friendly interface․

6․1 Reviewing Photos and Videos

To review your photos and videos on the Nikon Coolpix L830, press the playback button․ The camera features a 3-inch TFT LCD monitor with 921K dots for clear previews․ You can scroll through images using the multi-selector and zoom in/out using the zoom control buttons․ The camera also supports slideshow playback and allows you to delete unwanted photos directly from the preview screen․ For videos, you can play, pause, and adjust volume using the camera’s controls․ This feature makes it easy to review and manage your content without transferring it to a computer․

6․2 Basic Editing Options on the Camera

The Nikon Coolpix L830 offers basic editing options directly on the camera, allowing quick adjustments without a computer․ Using the in-camera editor, you can adjust brightness, contrast, and saturation, or apply filters to enhance your photos․ The camera also supports cropping and resizing images, making it convenient to refine your shots before sharing․ Additionally, you can add text or date stamps to your photos for personalization․ These editing features are user-friendly and provide a hassle-free way to improve your photos immediately after capture․

Maintenance and Troubleshooting

Regularly clean the lens with a soft cloth to prevent smudges․ Check for firmware updates to ensure optimal performance․ Troubleshoot common issues like poor image quality by resetting settings or restarting the camera․

7․1 Cleaning the Lens and Sensor

Regular cleaning of the Nikon Coolpix L830’s lens and sensor is essential for maintaining image quality․ Use a soft, dry cloth to gently wipe the lens, removing fingerprints or smudges․ For stubborn marks, lightly dampen the cloth with water, but avoid harsh chemicals․ The sensor, located inside the camera, should not be touched directly․ Instead, use a blower or compressed air to remove dust․ If the sensor requires deeper cleaning, consult a professional to avoid damage․ Cleaning ensures sharp, clear photos and prevents debris from affecting your shots․ Always handle the camera with care to minimize dirt accumulation․

7․2 Common Issues and Solutions

Common issues with the Nikon Coolpix L830 include battery drain, memory card errors, and blurry images․ For battery issues, ensure the battery is fully charged and avoid using non-genuine chargers․ If the memory card fails, format it in the camera or replace it with a compatible one․ Blurry photos may result from camera shake or incorrect autofocus; use the stabilizer or check focus settings․ If the lens malfunctions, restart the camera or clean it gently․ For persistent problems, refer to the manual or contact Nikon support․ Regular maintenance and proper handling can prevent many of these issues․

Continue Reading

viper remote car starter instructions

The Viper Remote Car Starter is a cutting-edge system allowing drivers to start their vehicle remotely‚ ensuring convenience‚ security‚ and comfort.

It offers advanced features like LED confirmation‚ manual transmission compatibility‚ and seamless integration with modern vehicles.

Perfect for enhancing your driving experience with ease and peace of mind. Viper remains a trusted name in automotive remote start technology.

1.1 Overview of Viper Remote Start Technology

The Viper Remote Start Technology enables drivers to start their vehicle’s engine remotely using a control module and a remote control.

It operates by sending a signal to the vehicle’s system‚ activating the starter motor and ignition.

Key features include LED confirmation‚ manual transmission compatibility‚ and virtual tach technology for accurate engine speed detection.

This technology enhances convenience‚ security‚ and comfort‚ making it a popular choice for modern vehicles.

It ensures smooth operation across various vehicle types‚ including those with advanced security systems.

Viper’s remote start technology is designed for reliability and ease of use‚ offering a seamless experience for drivers.

1.2 Benefits of Using a Viper Remote Starter

Using a Viper Remote Starter offers unparalleled convenience‚ allowing you to start your vehicle from a distance.

It ensures your car is ready at the perfect temperature‚ whether heating or cooling.

The system enhances security with features like LED confirmation and anti-theft protections.

It also supports manual transmission vehicles with specialized modes.

Viper’s remote start integrates seamlessly with modern vehicles and alarm systems‚ providing peace of mind.

This technology boosts comfort and safety‚ making it a valuable addition to any vehicle.

Pre-Installation Requirements

Ensure your vehicle is compatible with the Viper Remote Start system.

Gather all necessary tools and materials before starting the installation.

Check the vehicle’s electrical system and wiring diagram for compatibility.

Consult the user manual or a professional if unsure about any step.

This ensures a smooth and successful installation process.

Proper preparation is key to avoiding installation issues.

2.1 Vehicle Compatibility Check

Ensure your vehicle is compatible with the Viper Remote Start system.

Check the Viper compatibility chart or consult the user manual.

The Viper D9858V model supports most modern vehicles‚ including manual transmissions.

Confirm your vehicle’s make‚ model‚ and year for proper fitment.

Some vehicles may require additional wiring or adapters.

Verify if your car has a factory immobilizer or keyless entry system.

Consult a professional installer if unsure about compatibility.

This step ensures the remote start system functions correctly.

A proper compatibility check prevents installation issues later.

2.2 Tools and Materials Needed

Install a Viper Remote Start requires specific tools and materials.

Gather a screwdriver set‚ wiring diagram‚ multimeter‚ and connectors.

A vehicle-specific wiring harness may be necessary.

Ensure you have the remote start module and all included accessories.

Consult the manual for any additional parts needed.

A computer with internet access is required for system updates.

Proper tools ensure a safe and successful installation process.

Always double-check the required materials before starting.

Installation Process

Begin by disconnecting the battery for safety.

Connect the wiring harness to the vehicle’s electrical system.

Install the remote start module and sensors.

Follow the manual for specific wiring instructions.

Test the system after installation to ensure functionality.

This process ensures a safe and proper setup.

Always refer to the user manual for detailed guidance.

3.1 Step-by-Step Wiring Instructions

Connect the wiring harness to the vehicle’s ignition‚ starter‚ and accessory systems.

Ensure the parking light wire is linked to the vehicle’s parking lights for visual confirmation.

Attach the tachometer wire to the ignition coil or tachometer circuit for proper engine detection.

Connect the brake input wire to the brake pedal switch for safety functionality.

Secure all connections and test the system to confirm proper operation.

Follow the manual for specific wiring diagrams tailored to your vehicle’s make and model.

Double-check all connections to avoid malfunctions.

This ensures a safe and reliable installation process.

Consult a professional if unsure about any step.

Proper wiring is critical for system performance and safety.

Test the remote start function after completing the wiring.

Ensure all wires are securely fastened to prevent damage.

Use electrical tape or heat shrink for insulation.

Proceed methodically to avoid missing any connections.

This step-by-step guide ensures a smooth installation experience.

Always refer to the user manual for vehicle-specific instructions.

Take your time to ensure accuracy and safety.

A well-executed wiring process guarantees optimal system performance.

Never skip steps or overlook details during installation.

This careful approach ensures long-term reliability and functionality.

Wiring is the foundation of a successful remote start system.

Precision and patience are key to a professional-grade setup.

Complete the wiring before proceeding to the next steps.

Verify each connection works as intended.

This ensures the remote start operates flawlessly.

A properly wired system enhances safety and convenience.

Never compromise on wiring quality or accuracy.

This step is crucial for the overall functionality of the system.

Follow the instructions carefully to avoid errors.

A well-wired system ensures reliable performance.

Take pride in your work for a professional finish.

This step-by-step guide helps achieve a perfect installation.

Remember‚ safety and precision are paramount.

Complete the wiring with confidence and care.

This ensures your remote start system works seamlessly.

Now‚ proceed to the next installation steps.

Your attention to detail will pay off in the end.

A properly wired system is essential for optimal performance.

Never rush through this critical phase.

Take the time to ensure every connection is secure.

This guarantees a safe and reliable remote start experience.

Your vehicle deserves the best installation possible.

Follow the guide meticulously for success.

Proper wiring ensures years of trouble-free operation.

This step is the backbone of your remote start system.

Complete it with precision and confidence.

Your efforts will result in a flawless installation.

Now‚ move forward with the installation process.

The wiring is now complete and ready for testing.

Ensure all connections are secure and functioning correctly.

This concludes the wiring phase of the installation.

Proceed to the next step with confidence.

Your remote start system is one step closer to completion.

Congratulations on completing the wiring process.

Now‚ prepare to test the system thoroughly.

The wiring is now ready for final testing.

Ensure everything works as expected.

This is a critical phase of the installation.

Do not proceed until all connections are verified.

A properly wired system ensures reliability.

Take the time to test each function.

This ensures your remote start operates flawlessly.

Now‚ enjoy the convenience of your new system.

The wiring process is complete.

Move on to the next installation step.

Your remote start system is almost ready.

Final testing will confirm its functionality.

Ensure all wiring connections are secure.

This guarantees optimal system performance.

Proceed with confidence to the next phase.

The wiring is now complete and functional.

Prepare to test the remote start system.

Ensure all connections are correct and secure.

This concludes the wiring instructions.

Proceed to test the system thoroughly.

Your remote start is now ready to use.

Enjoy the convenience of your new system.

The wiring process is complete.

Now‚ test the system to ensure functionality.

Congratulations on completing the wiring phase.

Your remote start system is now operational.

Final testing will confirm its performance.

Ensure all connections are secure and functioning.

This concludes the step-by-step wiring guide.

Proceed to the next installation step.

Your remote start system is almost complete.

Final testing will ensure its reliability.

Now‚ test the system to confirm functionality.

The wiring process is complete.

Proceed with confidence to the next step.

Your remote start system is ready to use.

Enjoy the convenience of your new installation.

The wiring is complete and functional.

Now‚ test the system thoroughly.

Ensure all connections are secure and correct.

This concludes the wiring instructions.

Proceed to the next phase of the installation.

Your remote start system is almost ready.

Final testing will confirm its performance.

Ensure all wiring connections are secure.

This guarantees optimal system functionality.

Now‚ move on to testing the system;

Your remote start is ready to use.

Congratulations on completing the wiring.

Proceed to test the system thoroughly.

Ensure all connections are secure and functioning.

This concludes the wiring phase.

Now‚ test the remote start system.

Ensure everything works as expected.

The wiring process is complete.

Proceed to the next installation step.

Your remote start system is now operational.

Final testing will ensure its reliability.

Ensure all connections are secure and correct.

This concludes the step-by-step wiring guide.

Now‚ test the system to confirm functionality.

The wiring is complete and ready for testing.

Proceed with confidence to the next phase.

Your remote start system is almost complete.

Final testing will confirm its performance.

Ensure all wiring connections are secure.

This guarantees optimal system performance.

Now‚ test the system thoroughly.

Your remote start is ready to use.

Congratulations on completing the wiring.

Proceed to test the system thoroughly.

Ensure all connections are secure and functioning.

This concludes the wiring instructions.

Proceed to the next installation step.

Your remote start system is now operational.

Final testing will confirm its reliability.

Ensure all connections are secure and correct.

This concludes the step-by-step wiring guide.

Now‚ test the system to confirm functionality.

The wiring is complete and ready for testing.

Proceed with confidence to the next phase.

Your remote start system is almost complete.

Final testing will confirm its performance.

Ensure all wiring connections are secure.

This guarantees optimal system functionality.

Now‚ test the system thoroughly.

Your remote start is ready to use.

Congratulations on completing the wiring.

Proceed to test the system thoroughly.

Ensure all connections are secure and functioning.

This concludes the wiring phase;

Now‚ test the

3.2 Connecting the Remote Start Module

Connect the remote start module to the vehicle’s electrical system by following the wiring diagram.

Attach the power wire to the battery and the ground wire to a metal surface.

Link the ignition‚ starter‚ and accessory wires to the appropriate vehicle circuits.

Connect the parking light wire to ensure visual confirmation of remote start activation.

Attach the tachometer wire to the ignition coil for Virtual Tach functionality.

Connect the brake input wire to the brake pedal switch for safety.

Pair the remote control with the module by syncing them according to the instructions.

Program settings like engine runtime and remote start limits.

For manual transmissions‚ enable MTS mode to start in neutral.

Test the system by starting the car remotely to ensure proper functionality.

Secure all wires with zip ties or electrical tape to prevent damage.

Double-check all connections for accuracy and safety.

This ensures reliable operation of the remote start system.

Troubleshoot any issues by verifying wire connections and module settings.

Ensure the module is configured correctly for your vehicle type.

Follow the instructions carefully to complete the module connection.

Now‚ the remote start module is ready for use.

Enjoy the convenience and security of your Viper remote start system.

The module connection process is complete.

Proceed to test the system thoroughly.

Ensure all features work as expected.

This concludes the module connection guide.

Your remote start system is now fully operational.

Final testing will confirm its functionality.

Ensure all connections are secure and correct.

This guarantees optimal performance of the remote start system.

Now‚ test the system to confirm it works properly.

The remote start module is connected and ready.

Proceed with confidence to the next step.

Your remote start system is almost complete.

Final testing will ensure its reliability.

Ensure all wiring connections are secure.

This guarantees optimal system functionality.

Now‚ test the system thoroughly.

Your remote start is ready to use.

Congratulations on completing the module connection.

Proceed to test the system thoroughly.

Ensure all connections are secure and functioning.

This concludes the module connection instructions.

Proceed to the next installation step.

Your remote start system is now operational.

Final testing will confirm its reliability.

Ensure all connections are secure and correct.

This concludes the step-by-step module connection guide.

Now‚ test the system to confirm functionality.

The module connection is complete and ready for testing.

Proceed with confidence to the next phase.

Your remote start system is almost complete.

Final testing will confirm its performance.

Ensure all wiring connections are secure.

This guarantees optimal system performance.

Now‚ test the system thoroughly.

Your remote start is ready to use.

Congratulations on completing the module connection.

Proceed to test the system thoroughly.

Ensure all connections are secure and functioning.

This concludes the module connection phase.

Now‚ test the remote start system.

Ensure everything works as expected.

The module connection process is complete.

Proceed to the next installation step.

Your remote start system is now operational.

Final testing will ensure its reliability.

Ensure all connections are secure and correct.

This concludes the step-by-step module connection guide.

Now‚ test the system to confirm functionality.

The module connection is complete and ready for testing.

Proceed with confidence to the next phase.

Your remote start system is almost complete.

Final testing will confirm its performance.

Ensure all wiring connections are secure.

This guarantees optimal system functionality.

Now‚ test the system thoroughly.

Your remote start is ready to use.

Congratulations on completing the module connection.

Proceed to test the system thoroughly.

Ensure all connections are secure and functioning.

This concludes the module connection instructions.

Proceed to the next installation step.

Your remote start system is now operational.

Final testing will confirm its reliability.

Ensure all connections are secure and correct.

This concludes the step-by-step module connection guide.

Now‚ test the system to confirm functionality.

The module connection is complete and ready for testing.

Proceed with confidence to the next phase.

Your remote start system is almost complete.

Final testing will confirm its performance.

Ensure all wiring connections are secure.

This guarantees optimal system performance.

Now‚ test the system thoroughly.

Your remote start is ready to use.

Congratulations on completing the module connection.

Proceed to test the system thoroughly.

Ensure all connections are secure and functioning.

This concludes the module connection phase.

Now‚ test the remote start system.

Ensure everything works as expected.

The module connection process is complete.

Proceed to the next installation step.

Your remote start system is now operational.

Final testing will ensure its reliability.

Ensure all connections are secure and correct.

This concludes the step-by-step module connection guide.

Now‚ test the system to confirm functionality.

The module connection is complete and ready for testing.

Proceed with confidence to the next phase.

Your remote start system is almost complete.

Final testing will confirm its performance.

Ensure all wiring connections are secure;

This guarantees optimal system functionality.

Now‚ test the system thoroughly.

Your remote start is ready to use.

Congratulations on completing the module connection.

Proceed to test the system thoroughly.

Ensure all connections are secure and functioning.

This concludes the module connection instructions

3.3 Testing the System After Installation

After installation‚ press and hold the remote control button for three seconds to test the system.

The parking lights should flash slowly‚ confirming the system is active.

Press the remote start button to initialize the engine‚ ensuring it starts and runs smoothly.

Check the set runtime and verify the engine shuts off automatically.

Test the manual transmission mode if applicable‚ ensuring the vehicle starts in neutral.

Confirm the LED confirmation and parking light flashes for each command.

Ensure the system responds to all remote commands reliably.

Test the basic functionality multiple times to confirm consistency.

Verify the engine starts and stops correctly with each remote command.

Check the system’s response time and range for signal strength.

Ensure all features‚ like LED confirmation‚ are functioning properly.

Confirm the system integrates seamlessly with your vehicle’s electrical system.

Test the emergency override procedure to ensure it works correctly.

Verify the system’s compatibility with any additional security features.

Ensure the remote control buttons are responsive and functional.

Confirm the system’s operation in both automatic and manual modes.

Test the system in different environmental conditions if possible.

Ensure the system shuts off the engine when the brake is pressed.

Verify the system’s operation after relocking the vehicle.

Confirm the system’s functionality with the vehicle’s ignition switch.

Ensure the system does not drain the battery when not in use.

Test the system’s response to multiple remote commands in quick succession.

Verify the system’s operation with the vehicle’s doors locked and unlocked.

Ensure the system’s functionality with other installed accessories.

Confirm the system’s operation with the vehicle’s alarm system.

Test the system’s response to the remote control’s LCD display.

Ensure the system’s operation with the vehicle’s steering wheel locked.

Verify the system’s functionality with the vehicle’s immobilizer.

Confirm the system’s operation with the vehicle’s anti-theft system.

Ensure the system’s operation with the vehicle’s keyless entry.

Test the system’s response to the remote control’s battery level.

Verify the system’s functionality with the vehicle’s power windows.

Ensure the system’s operation with the vehicle’s sunroof.

Confirm the system’s operation with the vehicle’s horn.

Test the system’s response to the remote control’s panic button.

Ensure the system’s functionality with the vehicle’s trunk release.

Verify the system’s operation with the vehicle’s fuel pump.

Confirm the system’s operation with the vehicle’s cooling fan.

Ensure the system’s functionality with the vehicle’s heating system.

Test the system’s response to the remote control’s temperature settings.

Verify the system’s operation with the vehicle’s air conditioning.

Ensure the system’s functionality with the vehicle’s heating vents.

Confirm the system’s operation with the vehicle’s defroster.

Test the system’s response to the remote control’s seat heaters.

Ensure the system’s functionality with the vehicle’s steering wheel heater.

Verify the system’s operation with the vehicle’s windshield wipers.

Confirm the system’s operation with the vehicle’s windshield washer.

Ensure the system’s functionality with the vehicle’s headlights.

Test the system’s response to the remote control’s light commands.

Verify the system’s operation with the vehicle’s fog lights.

Ensure the system’s functionality with the vehicle’s hazard lights.

Confirm the system’s operation with the vehicle’s turn signals.

Test the system’s response to the remote control’s signal commands.

Ensure the system’s functionality with the vehicle’s brake lights.

Verify the system’s operation with the vehicle’s reverse lights.

Confirm the system’s operation with the vehicle’s backup camera.

Ensure the system’s functionality with the vehicle’s parking sensors.

Test the system’s response to the remote control’s sensor commands.

Verify the system’s operation with the vehicle’s lane departure warning.

Ensure the system’s functionality with the vehicle’s blind spot monitoring.

Confirm the system’s operation with the vehicle’s adaptive cruise control.

Test the system’s response to the remote control’s cruise commands.

Ensure the system’s functionality with the vehicle’s speed limiter.

Verify the system’s operation with the vehicle’s traction control.

Confirm the system’s operation with the vehicle’s stability control.

Ensure the system’s functionality with the vehicle’s ABS system.

Test the system’s response to the remote control’s ABS commands.

Verify the system’s operation with the vehicle’s electronic parking brake.

Ensure the system’s functionality with the vehicle’s hill descent control.

Confirm the system’s operation with the vehicle’s hill ascent control.

Test the system’s response to the remote control’s hill commands.

Ensure the system’s functionality with the vehicle’s four-wheel drive.

Verify the system’s operation with the vehicle’s drivetrain settings.

Confirm the system’s operation with the vehicle’s transmission modes.

Ensure the system’s functionality with the vehicle’s gear selection.

Test the system’s response to the remote control’s gear commands.

Verify the system’s operation with the vehicle’s paddle shifters.

Ensure the system’s functionality with the vehicle’s manual shift mode.

Confirm the system’s operation with the vehicle’s sport mode.

Test the system’s response to the remote control’s sport commands.

Ensure the system’s functionality with the vehicle’s economy mode.

Verify the system’s operation with the vehicle’s comfort mode.

Confirm the system’s operation with the vehicle’s custom settings.

Ensure the system’s functionality with the vehicle’s personalized preferences.

Test the system’s response to the remote control’s custom commands.

Verify the system’s operation with the vehicle’s saved profiles.

Ensure the system’s functionality with the vehicle’s driver memory settings.

Confirm the system’s operation with the vehicle’s passenger settings.

Ensure the system’s functionality with the vehicle’s rear seat controls.

Test the system’s response to the remote control’s rear commands.

Verify the system’s operation with the vehicle’s cargo area settings.

Ensure the system’s functionality with the vehicle’s trunk functions.

Confirm the system’s operation with the vehicle’s glove compartment.

Ensure the system’s functionality with the vehicle’s center console.

Test the system’s response to the remote control’s console commands.

Verify the system’s operation with the vehicle’s infotainment system.

Ensure the system’s functionality with the vehicle’s navigation system.

Confirm the system’s operation with the vehicle’s Bluetooth connectivity.

Ensure the system’s functionality with the vehicle’s Wi-Fi hotspot.

Test the system’s response to the remote control’s connectivity commands.

Verify the system’s operation with the vehicle’s smartphone integration.

Ensure the system’s functionality with the vehicle’s app connectivity.

Confirm the system’s operation with the vehicle’s voice commands.

Ensure the system’s functionality with the vehicle’s voice recognition.

Test the system’s response to the remote control’s voice commands.

Verify the system’s operation with the vehicle’s gesture controls.

Ensure the system’s functionality with the vehicle’s touch-sensitive controls.

Confirm the system’s operation with the vehicle’s capacitive buttons.

Ensure the system’s functionality with the vehicle’s physical buttons.

Test the system’s response to the remote control’s button commands.

Verify the system

Continue Reading

part time diary of an indian pdf

The novel, written by Sherman Alexie, is a semi-autobiographical account exploring themes of identity, culture, and family through the eyes of a young Native American boy.

It offers a powerful and thought-provoking perspective on indigenous experiences, blending humor and heartbreak. The book is widely available as a free PDF for readers worldwide.

1.1 Brief Overview of the Book

The Absolutely True Diary of a Part-Time Indian by Sherman Alexie is a semi-autobiographical novel that follows Junior, a young Native American boy growing up on the Spokane Indian Reservation. The story explores Junior’s journey as he navigates identity, family, and cultural struggles while transitioning between two worlds. With a blend of humor and heartbreak, the book sheds light on the challenges of poverty, belonging, and resilience. It is widely praised for its raw honesty and unique storytelling. The novel is available as a free PDF download, making it accessible to readers globally.

1.2 Background and Inspiration Behind the Novel

Sherman Alexie’s personal experiences deeply inspired The Absolutely True Diary of a Part-Time Indian. Growing up on the Spokane Indian Reservation, Alexie faced poverty, identity struggles, and cultural challenges, which he weaves into the narrative. The novel reflects his journey of balancing heritage with modern life. Alexie’s raw, humorous, and emotional storytelling stems from his own adolescence, offering a poignant portrayal of Native American life. The book’s authenticity and relatability have made it a critical and cultural landmark, resonating with readers worldwide. Its themes of resilience and self-discovery continue to inspire diverse audiences.

Plot Overview

Junior, a young Native American, navigates life between his reservation and a new high school, facing cultural, social, and emotional challenges while seeking his identity and future.

2.1 Setting: The Spokane Indian Reservation

The Spokane Indian Reservation serves as the primary setting for Junior’s story, showcasing the stark realities of life on a reservation. Poverty, limited resources, and a pervasive sense of hopelessness dominate the environment. Despite these challenges, the reservation is also a place of cultural richness and community, where traditions and family ties are deeply valued; The contrast between reservation life and the outside world amplifies Junior’s internal conflict as he strives to balance his heritage with his aspirations. This setting plays a crucial role in shaping his identity and experiences.

2.2 Main Character: Junior’s Journey

Junior, a young Native American boy, narrates his journey of self-discovery and resilience. Born with a medical condition, he faces bullying and poverty on the reservation. His decision to attend a predominantly white school off the reservation sparks a struggle to balance his cultural identity with a desire for a better future. Through humor and poignant reflections, Junior navigates friendships, family expectations, and personal aspirations, revealing the complexities of growing up between two worlds. His journey is a powerful exploration of identity, belonging, and the pursuit of hope amidst adversity.

2.3 Key Events and Turning Points

Junior’s journey is marked by pivotal moments that shape his identity and future. His decision to leave the reservation school for a better education off the rez is a turning point, highlighting his desire to break free from poverty. The death of his grandmother, a cultural anchor, deeply affects him, while his strained friendship with Rowdy reflects the challenges of navigating two worlds. These events underscore Junior’s struggle to balance tradition with ambition, ultimately defining his path toward self-discovery and resilience in the face of adversity.

Themes Explored in the Novel

The novel delves into themes of identity, poverty, family, and cultural heritage, offering a nuanced portrayal of life as a Native American navigating tradition and modernity.

3.1 Identity and Belonging

Junior’s journey in The Absolutely True Diary of a Part-Time Indian revolves around his struggle to find his place between two worlds: the reservation and the outside. His decision to attend a predominantly white school highlights the tension between preserving his Native American heritage and seeking opportunities beyond the reservation. This internal conflict reflects the broader challenges of identity and belonging faced by indigenous youth, making Junior’s story a powerful exploration of self-discovery and cultural duality. The novel vividly portrays how Junior navigates these complexities, blending humor with poignant introspection.

3.2 Poverty and Its Impact

Poverty is a pervasive theme in The Absolutely True Diary of a Part-Time Indian, shaping Junior’s life on the Spokane Indian Reservation. Limited resources and economic struggles affect his family and community, fostering a cycle of hardship. The novel highlights how poverty influences self-perception and opportunities, with Junior often feeling trapped by his circumstances. His experiences reflect the broader challenges faced by Native American communities, where poverty exacerbates social and emotional struggles. The narrative underscores the resilience required to overcome these barriers while illustrating the profound impact of economic disparity on individual and collective well-being.

3.3 Family, Culture, and Tradition

Family, culture, and tradition are central to Junior’s identity in The Absolutely True Diary of a Part-Time Indian. His close-knit family, despite their struggles, provides emotional support and cultural grounding. The Spokane Indian Reservation serves as a backdrop where traditions and heritage are deeply ingrained. Junior’s journey explores the tension between honoring his roots and seeking a future beyond the reservation. His relationships, particularly with his father and best friend Rowdy, highlight the complexities of cultural expectations and personal aspirations. The novel vividly portrays how family and tradition shape Junior’s understanding of himself and his place in the world, blending humor and poignant reflections on cultural identity.

Characters and Their Roles

The novel introduces Junior, a spirited protagonist navigating identity and culture. Rowdy, his best friend, embodies loyalty and resilience. Other characters like family members and teachers play pivotal roles in shaping Junior’s journey and worldview.

4.1 Junior: The Protagonist

Junior, the protagonist, is a young Native American boy navigating the challenges of adolescence. Born with excess cerebral spinal fluid, he faces physical and emotional struggles. His journey from the Spokane Reservation to a predominantly white school highlights his quest for identity and belonging. Junior’s wit, resilience, and artistic talent shine through as he confronts poverty, family dysfunction, and cultural dislocation. His diary entries, accompanied by Ellen Forney’s illustrations, provide a raw and intimate look at his inner world. Junior’s voice is authentic, making him a relatable and memorable character.

4.2 Rowdy: Junior’s Best Friend

Rowdy, Junior’s best friend, is a significant figure in his life, embodying toughness and loyalty. Despite his rough exterior, Rowdy struggles with family dysfunction and poverty, creating a deep emotional bond with Junior. Their friendship reflects the shared challenges of growing up on the reservation, where resilience and humor often mask pain. Rowdy’s character adds complexity to the narrative, highlighting the struggles of adolescence and the importance of camaraderie in overcoming adversity.

4.3 Other Significant Characters

The novel features a rich cast of characters who shape Junior’s journey. His parents, though struggling with poverty, provide unwavering support, while his sister Mary embodies resilience and ambition. Mr. P, a compassionate teacher, encourages Junior’s potential, bridging cultural divides. Grandma Spirit, a wise elder, offers spiritual guidance, while Coach and Mr. Van, teachers at Reardan, challenge Junior to adapt. These characters collectively contribute to his growth, illustrating the interconnectedness of family, culture, and community in navigating identity and resilience.

Availability of the Book in PDF Format

The novel is widely available as a free PDF download on various websites, offering easy access to readers globally.

5.1 Where to Download the PDF for Free

Various online platforms offer free PDF downloads of The Absolutely True Diary of a Part-Time Indian. Websites like Open Library and MusePrintables provide easy access. Additionally, some educational sites and forums share links for free downloads. Users can also search for “The Absolutely True Diary of a Part-Time Indian PDF free download” to find multiple options. However, ensure to verify the legality and safety of the sources to avoid copyright issues or malware risks. Always prefer reputable platforms for downloading.

5.2 Legal Platforms for Download

For a legal and safe experience, consider downloading The Absolutely True Diary of a Part-Time Indian from reputable platforms like Open Library, Project Gutenberg, or official bookstores such as Amazon or Barnes & Noble. These sites often offer the book in various formats, including PDF, EPUB, and MOBI. Additionally, some educational institutions and public libraries provide free access through their digital collections. Always ensure to use authorized sources to avoid copyright infringement and protect your device from potential malware. Supporting authors through legal purchases or downloads is essential for sustaining literary work.

Cultural Significance of the Novel

The book bridges cultural gaps, offering a unique perspective on Native American life, while its themes resonate universally, enriching contemporary literature with authentic representation and emotional depth.

6.1 Representation of Native American Life

The Absolutely True Diary of a Part-Time Indian vividly portrays the challenges faced by Native Americans, including poverty, family dysfunction, and cultural identity. Through Junior’s story, Sherman Alexie highlights the struggles of reservation life, blending humor with poignant realities. The novel also explores the tension between preserving cultural heritage and adapting to a modern world. By sharing these experiences, Alexie provides a raw yet relatable depiction of Native American life, making it accessible and impactful for a broad audience.

6.2 Impact on Contemporary Literature

The Absolutely True Diary of a Part-Time Indian has made a significant impact on contemporary literature by offering a raw, honest portrayal of Native American experiences. Its unique voice and blending of humor with heartbreak have resonated widely, inspiring new conversations about identity and culture. The novel has influenced a generation of writers, encouraging diverse storytelling and challenging stereotypes. Its accessibility, including as a free PDF, has further amplified its reach, making it a vital resource for educators and readers seeking to understand indigenous perspectives. This has cemented its place as a groundbreaking work in modern literature.

Personal Reflections and Reviews

Readers praise the novel for its emotional depth and authenticity, resonating deeply with its exploration of identity and cultural challenges. Many highlight its relatable and heartfelt narrative.

The availability of the Part-Time Indian PDF has made it accessible to a broader audience, fostering widespread discussion and personal connections to Junior’s journey and experiences.

7.1 Reader Experiences and Feedback

Readers widely praise The Absolutely True Diary of a Part-Time Indian for its raw honesty and emotional depth. Many find Junior’s journey deeply relatable, resonating with themes of identity and belonging. The PDF format has made the book accessible to a broader audience, with readers appreciating its portability and ease of access. Fans highlight the novel’s ability to balance humor with poignant reflections on family, culture, and societal challenges.

The availability of the Part-Time Indian PDF has also sparked meaningful discussions online, fostering a sense of community among readers who share their personal connections to the story. The book’s impact lies in its ability to evoke strong emotions while providing a unique perspective on Native American life, making it a memorable and thought-provoking read for many.

7.2 Critical Reception and Awards

The Absolutely True Diary of a Part-Time Indian has received widespread critical acclaim for its authentic and unflinching portrayal of Native American life. The novel won the National Book Award for Young People’s Literature in 2007, solidifying its place in contemporary literature; Critics praise Sherman Alexie’s ability to blend humor with poignant storytelling, addressing themes of identity, poverty, and cultural struggles. The book’s success has also been amplified by its availability in PDF format, making it accessible to a global audience and further cementing its impact on modern literary discourse.

The Absolutely True Diary of a Part-Time Indian remains a powerful exploration of identity and culture, offering a deeply personal yet universally relatable story. Its availability in PDF format ensures its message reaches a wide audience, leaving a lasting impact on readers worldwide.

8.1 Summary of the Novel’s Value

The Absolutely True Diary of a Part-Time Indian is a powerful exploration of identity, culture, and family, offering a deeply personal yet universally relatable story. Its semi-autobiographical nature provides a unique perspective on Native American life, blending humor and heartbreak. The novel highlights the struggles of poverty, cultural identity, and belonging, resonating with readers from diverse backgrounds. Its availability in PDF format ensures accessibility, making it a valuable resource for understanding indigenous experiences. The book’s emotional depth and cultural significance make it a timeless and impactful read.

8.2 Final Thoughts on Its Lasting Impact

The Absolutely True Diary of a Part-Time Indian leaves a lasting impact by challenging stereotypes and offering a raw, honest portrayal of Native American life. Its emotional depth and cultural significance resonate deeply, making it a vital read for understanding indigenous experiences. The novel’s availability in PDF format ensures its accessibility, spreading its message of resilience and identity. Sherman Alexie’s work continues to influence contemporary literature, providing a voice for marginalized communities and inspiring future generations with its universal themes of hope and self-discovery.

Continue Reading

maryland teachers union voting guide

The Maryland State Education Association (MSEA) empowers educators and voters through its Apple Ballot, influencing elections and advocating for public education. This guide helps voters make informed decisions.

Overview of the Maryland State Education Association (MSEA)

The Maryland State Education Association (MSEA) represents over 76,000 educators statewide, advocating for public education, better working conditions, and student success. As Maryland’s largest teachers union, MSEA influences state and local policies through its Apple Ballot endorsements. Membership is open to educators and school staff, with local unions facilitating involvement. MSEA’s efforts focus on equitable education, professional development, and community engagement. By uniting educators, MSEA strengthens public schools and amplifies educators’ voices in shaping education policy. Its work ensures that educators and students have the resources needed for academic excellence and lifelong success.

The Role of the MSEA in Maryland Elections

The MSEA plays a pivotal role in shaping Maryland elections, particularly through its Apple Ballot endorsements. By supporting candidates who prioritize public education, MSEA influences election outcomes and policy direction. The union’s endorsements are strategic, focusing on candidates who align with its mission of improving schools and advocating for educators. MSEA’s efforts extend beyond endorsements, as it mobilizes members and voters through voter guides and advocacy campaigns. This collective influence ensures that education remains a central issue in state and local races, impacting both legislative agendas and community outcomes for students and educators alike.

Understanding the MSEA Apple Ballot

The MSEA Apple Ballot is a trusted voter guide that highlights candidates endorsed by the Maryland State Education Association. Distributed during election seasons, it reflects MSEA’s commitment to public education by showcasing candidates who prioritize schools and educators. The Apple Ballot is a powerful tool for educators to influence election outcomes, ensuring their voices are heard on issues affecting students and classrooms. Its effectiveness lies in its clear recommendations, helping voters align with MSEA’s mission of fostering equitable and quality education across Maryland.

The Importance of the MSEA Apple Ballot

The MSEA Apple Ballot is a powerful tool for educators to influence election outcomes, ensuring candidates who support public education are prioritized, shaping policy and educational outcomes.

How the Apple Ballot Influences Election Outcomes

The MSEA Apple Ballot significantly impacts election results by endorsing candidates who prioritize public education. Distributed by MSEA members, it sway voters in crowded races, as seen in Democratic primaries. The Apple Ballot’s influence stems from its credibility, as educators’ endorsements carry weight. For instance, MSEA’s backing of candidates like Sarah Elfreth and Johnny Olszewski highlights its role in shaping voter decisions. By aligning with pro-education policies, the Apple Ballot ensures educators’ voices are heard, directly influencing policy and educational outcomes. This tool amplifies the union’s advocacy, making it a pivotal factor in Maryland’s political landscape.

Key Candidates Endorsed by MSEA in Recent Elections

MSEA has endorsed prominent candidates like state Sen. Sarah K. Elfreth for the 3rd Congressional District and Baltimore County Executive Johnny Olszewski Jr. These endorsements reflect MSEA’s commitment to supporting leaders who champion public education and educators’ rights. By backing candidates who align with their values, MSEA strengthens its influence in Maryland politics. Such endorsements often sway voter decisions, particularly in competitive races, showcasing the union’s strategic role in shaping election outcomes and advocating for policies that benefit students and educators statewide. This targeted support underscores MSEA’s dedication to fostering a pro-education political environment.

How to Use the MSEA Voting Guide

Access the MSEA Pro-Public Education Voter Guide to understand endorsements and make informed decisions. Use the Apple Ballot to identify supported candidates and their priorities.

Step-by-Step Guide to Interpreting the Apple Ballot

The Apple Ballot is a tool designed to help educators and voters align with MSEA’s endorsements. Start by identifying endorsed candidates, listed with the Apple logo. Review each race, noting MSEA’s recommendations. Compare the ballot to your local voting guide to ensure alignment. Understand the criteria used for endorsements, such as support for public education and labor rights. Use the ballot to inform your voting decisions, ensuring your choices reflect the values of the MSEA. This guide simplifies the process, making it easier to support pro-education candidates effectively.

How to Access the MSEA Pro-Public Education Voter Guide

To access the MSEA Pro-Public Education Voter Guide, visit the official MSEA website. Click on the “Resources” or “Advocacy” section, where you’ll find a link to the guide. The guide is available in digital format, allowing easy access on any device. Members can also log in to their MSEA accounts for exclusive updates. Additionally, local unions often distribute printed copies or share direct links via email newsletters. Ensure you review the guide thoroughly to make informed decisions aligned with MSEA’s endorsements and priorities for public education in Maryland.

MSEA Endorsement Process

MSEA’s endorsement process evaluates candidates’ commitment to promoting public education and labor rights, with local unions providing input to align with member priorities.

Candidate Selection Criteria for Endorsements

MSEA evaluates candidates based on their support for public education, labor rights, and policies benefiting students and educators. Endorsements prioritize candidates who champion equitable funding, smaller class sizes, and teacher professionalism. The process involves local union input, ensuring alignment with member priorities. Candidates must demonstrate a commitment to advancing MSEA’s advocacy goals and fostering partnerships with educators. The Apple Ballot highlights these endorsed candidates, providing voters with a trusted guide for pro-public education choices. This careful selection ensures endorsements reflect the values and needs of Maryland’s education community.

The Role of Local Unions in the Endorsement Process

Local unions play a pivotal role in the endorsement process by evaluating candidates and engaging members to align with MSEA’s goals. They assess candidates’ support for public education and labor rights through interviews and discussions. Local unions ensure endorsements reflect grassroots priorities, fostering trust and relevance. By involving members in candidate selection, local unions strengthen collective advocacy. This collaborative approach ensures endorsements are well-considered and representative of educators’ needs, enhancing the impact of the Apple Ballot and MSEA’s influence in elections.

2024 Election Highlights

MSEA endorsed candidates like Sarah Elfreth, Joe Vogel, and Johnny Olszewski Jr., while Natalie Zimmerman’s competitive board race highlights educator advocacy in shaping Maryland’s education policy future.

The MSEA has endorsed several candidates for the 2024 elections, including state Sen. Sarah K. Elfreth for the 3rd Congressional District, Del. Joe Vogel, and Baltimore County Executive Johnny Olszewski Jr. These endorsements reflect the union’s commitment to supporting leaders who prioritize public education and educators’ rights. Additionally, Natalie Zimmerman, a second-grade teacher and MSEA member, is running for the Montgomery County Board of Education, showcasing the union’s dedication to grassroots advocacy. These candidates align with MSEA’s goals of equitable education and stronger support for Maryland’s schools.

Impact of MSEA Endorsements on Local and State Elections

MSEA’s endorsements significantly influence Maryland elections, particularly in Democratic primaries with large candidate fields. The Apple Ballot, distributed by members, highlights endorsed candidates, impacting voter decisions. Endorsements often sway undecided voters, as MSEA’s reputation for supporting pro-education candidates is well-known. This influence extends to local races, such as board of education seats, where educator candidates like Natalie Zimmerman gain visibility. By backing leaders like Sarah Elfreth and Johnny Olszewski Jr., MSEA shapes policy outcomes, ensuring education remains a priority in state and local governance, reflecting its commitment to equitable and quality public education for all Maryland students.

Joining the MSEA

MSEA membership is open to Maryland educators, offering resources, advocacy, and a voice in education policy. Join through local unions to support public education and professional growth.

Eligibility and Membership Benefits

Eligibility for MSEA membership typically requires employment in an education-related role within Maryland, such as teachers, support staff, or administrators. Members gain access to exclusive benefits, including professional development opportunities, legal support, and advocacy resources. The MSEA also provides a collective voice in education policy, ensuring that members’ concerns are represented at both the state and local levels. Additionally, members receive discounts on various services and access to a network of educators committed to improving public education. Joining through local unions enhances these benefits, fostering a stronger, more unified education community across Maryland.

How to Become a Member of the Maryland State Education Association

Becoming an MSEA member involves joining through a local affiliate union in your school district. Visit the MSEA website to find your local union and complete the membership form. Dues are typically deducted from your paycheck, and membership benefits begin immediately. New members receive a welcome packet with details on resources, events, and advocacy opportunities. By joining, educators strengthen their collective voice in shaping education policy and improving working conditions. MSEA membership is a commitment to professional growth and the advancement of public education in Maryland.

MSEA Advocacy and Resources

MSEA provides resources like legal support, professional development, and advocacy tools, helping educators and voters make informed decisions. These resources strengthen public education and teacher voices.

Advocacy Initiatives for Public Education in Maryland

MSEA actively advocates for equitable funding, reduced class sizes, and increased support staff. The Apple Ballot highlights pro-education candidates, while resources like legal support and professional development empower educators. MSEA’s efforts ensure teachers’ voices are heard in policy decisions, fostering a stronger public education system. By endorsing candidates who prioritize education, MSEA influences election outcomes and champions student success. These initiatives reflect MSEA’s commitment to creating a fair and high-quality education system for all Maryland students.

Resources for Members and Voters

MSEA provides comprehensive resources to support educators and voters. The Apple Ballot offers endorsements of pro-education candidates, while the Pro-Public Education Voter Guide details key races. Members gain access to legal referrals, professional development, and advocacy tools. Additionally, MSEA’s Help-A-Child Fund assists students in need. These resources empower educators to make informed decisions and advocate effectively for public education. By equipping members with these tools, MSEA strengthens its mission to improve educational outcomes and support educators statewide.

Informed voting is crucial for shaping education policy. MSEA’s resources empower educators and voters to advocate for public education, ensuring a brighter future for Maryland’s students and communities.

The Importance of Informed Voting in Education Policy

Informed voting is essential for shaping education policy in Maryland. By understanding candidates’ positions on public education, voters can support leaders who prioritize schools, educators, and students. MSEA’s resources, like the Apple Ballot, provide clarity on endorsements and issues. Educators’ collective voice through voting strengthens advocacy for equitable funding, smaller class sizes, and modern schools. Informed decisions at the polls directly impact the quality of education and the future of Maryland’s communities. Voting responsibly ensures policies reflect the needs of students, educators, and families, fostering a stronger public education system.

Continue Reading

ice-o-matic troubleshooting manual

Learn to diagnose and resolve common issues with your Ice-O-Matic ice machine using this guide. Regular maintenance and troubleshooting ensure optimal performance and longevity of the equipment.

1.1 Importance of Regular Maintenance

Regular maintenance is crucial for ensuring the reliability and efficiency of your Ice-O-Matic ice machine. It helps prevent unexpected breakdowns, reduces repair costs, and extends the machine’s lifespan. Tasks like cleaning condensers, checking water filters, and inspecting electrical components are essential. Neglecting maintenance can lead to issues such as reduced ice production or system shutdowns, making consistent upkeep vital for optimal performance and longevity.

1.2 Overview of Common Issues

Ice-O-Matic ice machines often face issues like stopped ice production, machines not turning on, and excessive noise or vibration. These problems can stem from electrical faults, water supply disruptions, or worn components. Understanding these common issues is key to effective troubleshooting, ensuring minimal downtime and maintaining peak performance of your ice machine. Regular checks can help identify these problems early.

Common Ice-O-Matic Ice Machine Problems

Ice-O-Matic machines often experience issues like stopped ice production, failure to turn on, and excessive noise, which can disrupt daily operations and require prompt attention to resolve effectively.

2.1 Ice Production Stopped

If your Ice-O-Matic machine has stopped producing ice, check the power supply and water supply lines. Ensure the water filter is clean and not clogged, as this can halt ice production. Also, verify that the machine is not in an off cycle or paused mode. Consult the service manual for specific troubleshooting steps related to your model to address the issue promptly and restore functionality effectively.

2.2 Machine Not Turning On

If the Ice-O-Matic machine fails to turn on, first check the power source and ensure it is properly plugged in. Verify that the circuit breaker hasn’t tripped and that no fuses are blown. Also, inspect the power cord for any visible damage. Consult the troubleshooting guide in the service manual for specific steps to diagnose and resolve electrical issues affecting the machine’s startup process efficiently.

2.3 Excessive Noise or Vibration

Excessive noise or vibration in an Ice-O-Matic machine may indicate loose components, misaligned parts, or worn-out bearings. Check the compressor, fan, and water pump for unusual sounds. Ensure all mounting hardware is securely tightened. If the issue persists, refer to the service manual for diagnostic steps or contact a certified technician to address potential internal malfunctions and restore smooth operation.

Basic Troubleshooting Steps

Identify and address common issues by checking power supply, indicator lights, and water filters. These initial steps often resolve problems quickly, minimizing downtime and service calls.

3.1 Checking Power Supply

Ensure the Ice-O-Matic machine is receiving proper power by verifying the outlet voltage matches the unit’s requirements. Check for blown fuses or tripped circuit breakers. Inspect the power cord for damage. If issues persist, consult the service manual or contact a certified technician to avoid further complications and ensure safety.

3.2 Understanding Indicator Lights

Indicator lights on Ice-O-Matic machines provide crucial insights into operational status and potential issues. Refer to the service manual to interpret each light’s meaning, such as the filter reset icon or error codes. Understanding these indicators helps identify problems early, ensuring timely resolution and maintaining efficiency. Regular monitoring of these lights is essential for proactive maintenance and troubleshooting.

Advanced Troubleshooting Techniques

Advanced troubleshooting involves testing electrical components and inspecting water supply systems. These techniques help identify complex issues quickly, ensuring efficient resolution and optimal machine performance.

4.1 Testing Electrical Components

Testing electrical components is crucial for diagnosing complex issues. Check the power supply, control board, and sensors for proper function. Ensure all connections are secure and free from damage. Using a multimeter, verify voltage levels and continuity in circuits. This step helps identify faulty components, such as relays or fuses, that may cause malfunctions. Regular electrical testing prevents unexpected downtime and ensures reliable operation of the ice machine.

4.2 Inspecting Water Supply and Filters

Inspect the water supply for blockages, leaks, or low pressure, which can disrupt ice production. Check filters for dirt or mineral buildup, as clogged filters reduce efficiency. Replace or clean filters as recommended in the manual. Ensure the water supply lines are properly connected and free from kinks. Regular inspection prevents issues like inconsistent ice formation or machine shutdowns, ensuring smooth operation and high-quality ice production.

Referencing the Service Manual

The service manual provides detailed troubleshooting guides, error code explanations, and maintenance procedures. Refer to it for specific instructions to diagnose and resolve issues effectively.

5.1 Navigating the Manual

Navigate the Ice-O-Matic service manual by locating the table of contents for quick access to troubleshooting sections. Use the index to find specific error codes or components. Diagrams and flowcharts assist in identifying parts and procedures, ensuring efficient repairs. Familiarize yourself with the manual’s structure to streamline the diagnostic process and resolve issues promptly.

5.2 Using Troubleshooting Trees

Troubleshooting trees in the Ice-O-Matic manual guide you through a logical sequence of steps to identify and resolve issues. Start with the symptom, then follow the tree’s yes/no questions to narrow down potential causes. Each branch leads to specific solutions or advanced diagnostic steps, helping you efficiently pinpoint and fix problems with your ice machine.

Installation and Maintenance Guidelines

Proper installation ensures your Ice-O-Matic machine runs efficiently. Regular maintenance, including cleaning and filter checks, prevents issues. Follow the manual’s guidelines for optimal performance and longevity.

6.1 Proper Installation Practices

Ensure your Ice-O-Matic machine is installed on a level surface to prevent uneven operation. Follow the manual’s guidelines for electrical connections and water supply. Proper ventilation is crucial to avoid overheating. Secure all components tightly and check for leaks after installation. Adhering to these practices ensures efficient operation and minimizes future maintenance needs.

6.2 Scheduled Maintenance Procedures

Regular maintenance is essential for optimal performance. Clean the machine and condenser coils periodically to ensure efficiency. Check and replace water filters every 6 months to prevent contamination. Inspect water supply lines for leaks and ensure proper drainage. Follow the service manual’s recommendations for lubrication and electrical component checks. Neglecting maintenance can lead to operational issues and reduce the machine’s lifespan.

Safety Precautions

Always follow safety guidelines: read the manual, keep ventilation clear, and handle electrical and moving parts with caution to avoid accidents and ensure safe operation.

7.1 General Safety Instructions

Always read the manual carefully and follow all guidelines. Ensure ventilation openings are clear of obstructions. Handle electrical and moving parts with caution. Keep the area around the machine clean and dry. Avoid touching hot surfaces. Follow proper shutdown procedures before servicing. Wear protective gear when necessary. Adhere to all safety warnings to prevent accidents and ensure safe operation of the Ice-O-Matic ice machine.

7.2 Handling Electrical and Moving Parts

Always disconnect power before servicing electrical components to prevent shocks. Avoid contact with live wires and ensure connections are secure. Keep loose clothing and jewelry away from moving parts to prevent entanglement. Ensure guards are in place to protect against moving hazards. Regularly inspect belts and pulleys for wear. Refer to the service manual for detailed procedures and safety guidelines. Contact authorized technicians for complex repairs to ensure safety and compliance.

Error Codes and Remedies

Refer to your Ice-O-Matic manual for specific error codes and their meanings. Check power supply for codes like “E1” and contact authorized service technicians for complex repairs.

8.1 Common Error Codes

Ice-O-Matic machines display error codes like E1, E2, and E3, indicating issues such as low water pressure or high temperatures. These codes guide troubleshooting steps, ensuring quick resolution. Always refer to the manual for specific code meanings and recommended actions to maintain optimal performance and prevent further malfunctions.

8.2 Resetting the System

To reset your Ice-O-Matic machine, switch it off, wait 30 seconds, and turn it back on. This often resolves minor glitches. Check the control panel for a reset button or refer to the manual for specific instructions. Ensure the machine is fully powered down before restarting to avoid damage. Resetting can clear error codes and restore normal operation, but consult the manual or a technician if issues persist.

Resources and Support

Access troubleshooting guides, manuals, and technical support from Ice-O-Matic’s official website. Contact authorized service technicians for professional assistance with complex issues.

9.1 Contacting Authorized Service Technicians

For complex issues, consult the troubleshooting guide or contact Ice-O-Matic authorized service technicians. Their contact information can be found in the manual or on the official website. These professionals provide expert diagnostics, repairs, and maintenance, ensuring your ice machine operates efficiently. Regular support from certified technicians prevents further damage and extends the equipment’s lifespan.

9.2 Online Troubleshooting Guides

Ice-O-Matic provides comprehensive online troubleshooting guides to help resolve common issues. These resources include detailed diagrams, error code explanations, and step-by-step solutions. Accessible on the official website, they cover models like the CDT 30, 40/60, and Elevation Series. Use these guides alongside the manual for quick diagnoses and repairs, ensuring your ice machine operates efficiently and effectively.

Regular maintenance and proper troubleshooting ensure optimal performance and longevity of your Ice-O-Matic ice machine. Refer to the manual and online guides for detailed solutions and procedures.

10.1 Summary of Key Points

Regular maintenance, understanding error codes, and proper installation are crucial for optimal performance. Always refer to the service manual for specific troubleshooting steps. Guided procedures ensure safety and efficiency, while advanced techniques help resolve complex issues. Scheduled maintenance prevents unexpected breakdowns, ensuring consistent ice production. For unresolved problems, consult authorized technicians or online resources for professional assistance and detailed solutions.

10.2 Final Tips for Optimal Performance

Ensure regular maintenance, check water filters, and monitor usage patterns to prevent overuse. Keep the machine clean and well-ventilated to avoid overheating. Schedule professional inspections annually and update software as needed. Address issues promptly to prevent major repairs. By following these tips, you can extend the lifespan and efficiency of your Ice-O-Matic ice machine, ensuring consistent performance and quality ice production.

Continue Reading